Installing ArtiSynth from GitHub into Eclipse (Linux)
Last updated: July, 2024
1 Overview
This document describes how to install ArtiSynth directly from GitHub and import it into the Eclipse IDE (Integrated Development Environment), within a Linux environment. While for demonstration purposes it is faster to install ArtiSynth using a precompiled release, installing from GitHub provides access to the most recent updates, and the Eclipse IDE is a convenient platform for developing and modifying the Java code used to create ArtiSynth models.
There are three parts to the installation process:
-
1.
Ensuring you have a Java development kit (JDK)
-
2.
Installing Eclipse
-
3.
Installing ArtiSynth from GitHub
Your host machine should be a 64 bit system that is based on the Intel processor. ArtiSynth may also run on ARM-based systems that provide an Intel compatibility layer. We recommend a minimum of 8 Gbytes of memory, and 16 Gbytes or more is better if you are doing FEM work with larger numbers of elements.
This document is intentionally brief and describes only installation from Git into an Eclipse IDE. More complete instructions, including how to create and add models, integrate external models, and update ArtiSynth, are given in the General Installation Guide. Instructions for visualizing, navigating, editing and simulating models are given in the ArtiSynth User Interface Guide. Instructions on how to build a model using Java are given in the ArtiSynth Modeling Guide.
2 Java JDK Requirements
ArtiSynth requires that you have a full 64-bit Java development kit (JDK) installed, which comes with a Java compiler; a simple run time environment (JRE) will not be sufficient.
Important: on ARM-based machines, you must still install a 64-bit Intel-based JDK which must then execute through an Intel compatibility layer. Invocation of the compatibility layer should generally be invisible to the user. 64-bit Intel-based JDKs contain the string x64 in their download names, whereas ARM-based JDKs contain aarch64 or arm32.
You will require a JDK version 8 or higher. The most recent JDK with long term support is version 21. If you are planning to use ArtiSynth with MATLAB, there are restrictions on which JDK you can use, as described in the guide Interfacing ArtiSynth to MATLAB.
If you need a JDK, we recommend installing one from Oracle. At the time of this writing, the download page is at:
Download tabs for JDK 22, 21 and 17 are located near the top. Tabs for downloading JDK 8 and 11 are located further down the page. Downloads are available for all systems (Linux, macOS and Windows); be sure to choose the link appropriate to yours.
If you want to run ArtiSynth or compile it from a terminal window, you will need to make sure that your JDK is visible to from a terminal window. To verify this, open a terminal window, run the command javac -version, and check that the command is found and that the version matches the JDK. If it does not, follow the instructions in Section 6.
3 Installing Eclipse
Eclipse is an integrated development environment (IDE) that is commonly used for writing and maintaining Java programs. While other IDEs exist for Java, such as NetBeans and IntelliJ, Eclipse is currently the most commonly used amongst ArtiSynth users. It should be noted, however, that an IDE is not required for Java programming; simpler programs, in particular, can often be created by editing the .java source files using a text editor and then compiling them with command line tools, including the compile utility supplied by ArtiSynth.
This document describes specifically the installation of Eclipse 2020-12; other versions should be similar.
Eclipse can be downloaded from www.eclipse.org/downloads/packages. From this page, choose “Eclipse IDE for Java Developers”, Linux x86_64, which will download the file
eclipse-java-2020-12-R-linux-gtk-x86_64.tar.gz
Untar this file into any desired install location, and then run the eclipse executable in the top-level directory. The following dialog will appear, asking you to select a workspace directory:

This is where Eclipse settings and project information will be stored. Unless you have a another Eclipse already installed, the default location should be fine. (Remember also to check the “Use this as the default ...” box so that this query won’t appear every time you open Eclipse.) Next, click Launch. A welcome page will appear; close this. A “donate” panel may also appear; close this too. You should then see an empty Eclipse display, similar to this:
3.1 Configuring Eclipse with the JDK
Newer versions of Eclipse come with their own version of Java. However, since we typically want to use our own JDK, as discussed above, we need to configure Eclipse to use that instead.
Eclipse can be configured to use your JDK as follows:
-
1.
From the main menu, select “Window > Preferences”.
-
2.
A Preferences dialog will open. In the left panel, select “Java > Installed JREs”, which will open an Installed JREs panel. Click the Add... button at the right.
-
3.
A JRE Type dialog will appear. Leave “Standard VM” selected in the dialog and click Next.
-
4.
A JRE Definition dialog will appear. In the “JRE home” field at the top, enter the Java home directory where your JDK was installed.
-
5.
Click Finish. The desired JDK will now show up in the list of installed JREs. Click on the left box to select it; ignore any warnings about Java 15 compatibility.
-
6.
Finish by clicking the “Apply and Close” button at the bottom of the Preferences dialog.
4 Installing ArtiSynth
You can now install ArtiSynth from GitHub.
-
1.
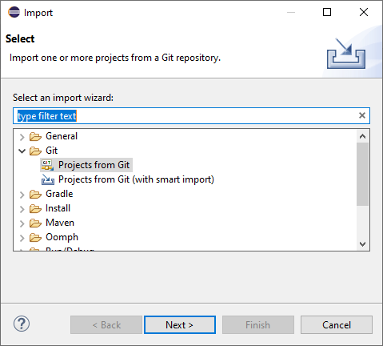
From the panel at the left of the main Eclipse frame, choose “Import projects...”. This will cause an Import dialog to appear, as shown below. Open “Git > Projects from Git”, and then click Next.
-
2.
In the next dialog, choose Clone URI, and click Next.
-
3.
A Source Git Repository dialog will appear, as shown below. In the URI field at the top, enter
https://github.com/artisynth/artisynth_core.git
This will automatically fill the Host and Repository path fields. Click Next.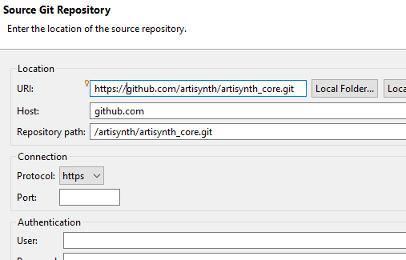
-
4.
A Branch Selection dialog will appear; uncheck svn, so that only master is selected. Click Next.
-
5.
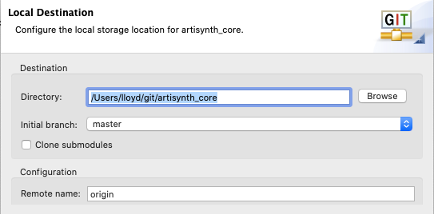
A Local Destination dialog will appear, as shown below, indicating the directoryinto which ArtiSynth will be placed locally. Use the default location, or edit it to some other desired location. This will be your ArtiSynth installation directory. Click Next.
-
6.
ArtiSynth will now be downloaded; this may take a few minutes, depending on your network connection speed. Another dialog will appear, asking you to select to project import wizard. Leave the default (“Import existing Eclipse projects”) selected, and click Next.
-
7.
An Import Projects dialog will appear, confirming that you want to import artisynth_core. Leave everything as is, and click Finish.
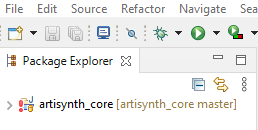
artisynth_core has now been imported into Eclipse as a project. However, we are not quite done. Eclipse will try to compile artisynth_core, but will fail because some Java and native libraries are missing. (These libraries are not included in the GitHub repository because they are quite large.) The compile failure will be indicated by a red exclamation mark next to the artisynth_core project entry in the Package Explorer:
The Java and native libraries must be downloaded separately, outside of Eclipse. Open a terminal window, change directories to the ArtiSynth installation folder (e.g., /home/roger/artisynth_core), and run the commandbin/updateArtisynthLibs:
 > cd /home/roger/artisynth_core
 > bin/updateArtisynthLibs
The process may take a few minutes, depending on network speed.
When the libraries are loaded, return to Eclipse, click on the artisynth_core project to select it, then “refresh”, either by right clicking and selecting Refresh, or by hitting the F5 key. Eclipse should now find the libraries and compile ArtiSynth; a green progress bar will appear at the lower right while compilation is in progress.
5 Running ArtiSynth
You should now be able to run ArtiSynth. From the main menu, select artisynth_core by clicking on it in the Package Explorer, and then from the main menu select Run > Run, and the ArtiSynth application will start up (perhaps a little slowly the first time).
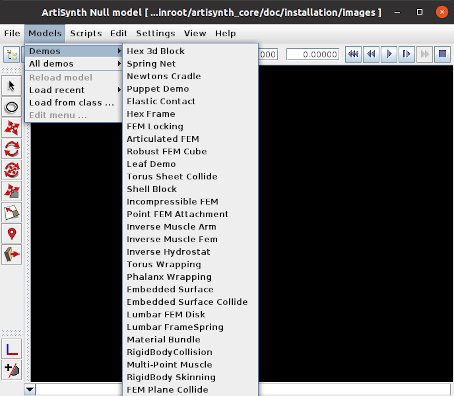
Within ArtiSynth, you can load a demonstration model by selecting Models > Demos from the main menu and choosing a demo model:
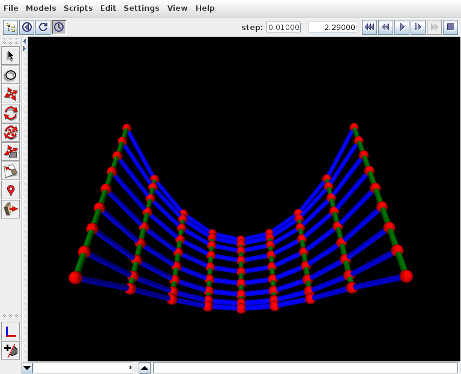
Once a model is loaded, it will appear in the viewer, and simulation can be controlled using the “play” controls located at the upper right of the application window:
From left to right, these are: step size control, which controls the simulation step size (in seconds); current simulation time (in seconds); and the reset, skip-back, play/pause, single-step and skip-forward buttons. Starting and stopping a simulation is done by clicking play/pause, and resetting it to time 0 is done by clicking reset. The single-step button advances the simulation by one time step.
A model can also be loaded by specifying either its defining class or a .art file containing its textual representation. For details, see the section “Loading, Simulating and Saving Models” in the ArtiSynth User Interface Guide. The model menu can also be customized, as described in “Customizing the Model Menu”. The interface guide also contains information on using the ArtiSynth GUI for model visualization, navigation, editing, and simulation control. Instructions on how to build a model using Java are given in the ArtiSynth Modeling Guide.
The image below shows ArtiSynth with the Spring Net demo loaded:
6 Making the Java JDK visible to your system
If the java and javac commands of your Java JDK are not visible from a terminal command window, then one fix is to add the directory <JDK_HOME>/bin to your system PATH variable, where <JDK_HOME> is the installation directory for your JDK. In particular, <JDK_HOME>/bin should be added ahead of any other Java installations that might be specified on the PATH. If you are using the bash shell, then modifications to PATH can be made inside a .bashrc file located in your home directory. For example, if <JDK_HOME> is /opt/java/jdk-21.0.2, then you can add the line
export PATH="/opt/java/jdk-21.0.2/bin:$PATH"
to your .bashrc. To see the current contents of the PATH, open a terminal window and run the command
> echo $PATH
![[LOGO]](data:image/png;base64,iVBORw0KGgoAAAANSUhEUgAAAAsAAAAOCAYAAAD5YeaVAAAAAXNSR0IArs4c6QAAAAZiS0dEAP8A/wD/oL2nkwAAAAlwSFlzAAALEwAACxMBAJqcGAAAAAd0SU1FB9wKExQZLWTEaOUAAAAddEVYdENvbW1lbnQAQ3JlYXRlZCB3aXRoIFRoZSBHSU1Q72QlbgAAAdpJREFUKM9tkL+L2nAARz9fPZNCKFapUn8kyI0e4iRHSR1Kb8ng0lJw6FYHFwv2LwhOpcWxTjeUunYqOmqd6hEoRDhtDWdA8ApRYsSUCDHNt5ul13vz4w0vWCgUnnEc975arX6ORqN3VqtVZbfbTQC4uEHANM3jSqXymFI6yWazP2KxWAXAL9zCUa1Wy2tXVxheKA9YNoR8Pt+aTqe4FVVVvz05O6MBhqUIBGk8Hn8HAOVy+T+XLJfLS4ZhTiRJgqIoVBRFIoric47jPnmeB1mW/9rr9ZpSSn3Lsmir1fJZlqWlUonKsvwWwD8ymc/nXwVBeLjf7xEKhdBut9Hr9WgmkyGEkJwsy5eHG5vN5g0AKIoCAEgkEkin0wQAfN9/cXPdheu6P33fBwB4ngcAcByHJpPJl+fn54mD3Gg0NrquXxeLRQAAwzAYj8cwTZPwPH9/sVg8PXweDAauqqr2cDjEer1GJBLBZDJBs9mE4zjwfZ85lAGg2+06hmGgXq+j3+/DsixYlgVN03a9Xu8jgCNCyIegIAgx13Vfd7vdu+FweG8YRkjXdWy329+dTgeSJD3ieZ7RNO0VAXAPwDEAO5VKndi2fWrb9jWl9Esul6PZbDY9Go1OZ7PZ9z/lyuD3OozU2wAAAABJRU5ErkJggg==)