ArtiSynth Installation Guide for Windows
Last updated: March, 2018
Contents:
- 1 Introduction
- 2 Prerequisites
- 3 Downloading a Prepacked Release
- 4 Cloning from Github
- 5 Building ArtiSynth
- 6 Running ArtiSynth
- 7 Installing External Models and Packages
- 8 Updating ArtiSynth
-
9 The Eclipse IDE
- 9.1 Obtaining Eclipse
- 9.2 Importing ArtiSynth projects into Eclipse
- 9.3 Configuring environment variables
- 9.4 Command line and JVM arguments
- 9.5 Adding projects to the build path
- 9.6 Adding projects to the ArtiSynth launch configuration
- 9.7 Installing a Subversion plug-in
- 9.8 Preventing excessive resource copying
- 10 Additional Information
1 Introduction
This document describes how to install and run ArtiSynth on 64-bit Windows machines. There are two ways to obtain ArtiSynth: downloading a prepackaged release, or cloning the latest development version from Github. Downloading a prepackaged release is the easiest solution to simply try out some of the basic demo programs. Cloning the development version is recommended for developers who want to keep their codebase current.
The typical install sequence looks like this:
Generally, users will also want to install and run external models and packages that have been created either by others or by themselves. This is discussed in (Section 7).
2 Prerequisites
To install ArtiSynth on Windows, you will need:
-
•
A 64 bit version of Windows
-
•
Java 8
-
•
Linux systems require GNU libc version 2.17 or higher
-
•
A three button mouse is recommended for GUI interaction
Note that we have stopped officially supporting 32 bit systems, both because they are becoming obsolete, and because ArtiSynth applications often require more memory than they can provide.
For Java, the full Java development kit (JDK) is required, which comes with the Java compiler javac. The run time environment (JRE) will not be sufficient. However, there is no need for extra bundles such at JavaFX, NetBeans, or EE.
At the time of this writing, JDKs can be obtained free from Oracle at
http://www.oracle.com/technetwork/java/javase/downloads/index.html.
We recommend obtaining a JDK for Java 8, for which the latest update is Java SE 8u162.
By default, ArtiSynth is compiled to be compliant with Java 8. While it should also be possible to run ArtiSynth under Java 9, there have been reports of compatibility problems and warnings involving the Java OpenGL (JOGL) interface. Therefore we recommend using Java 8 until these issues are resolved. Java 8 is also compatible with current releases of MATLAB, which is useful if one wishes to run ArtiSynth from MATLAB.
Java versions 5 and earlier had an additional ``1.'' prepended to their number, so that Java 5 was called 1.5. This numbering scheme still persists informally, so that Java 8 is occasionally referred to as 1.8, etc.
In this document, the location of the ArtiSynth installation folder will be denoted by <ARTISYNTH_HOME>. for example if ArtiSynth is installed in
C:\people\roger\artisynth_core
then <ARTISYNTH_HOME> denotes this folder and <ARTISYNTH_HOME>\lib denotes the sub-folder
C:\people\roger\artisynth_core\lib
3 Downloading a Prepacked Release
3.1 Downloading and unpacking the zip file
To obtain one of the packaged distributions, go to www.artisynth.org/downloads and select the distribution you want. Download it, and unzip it in an appropriate location on your computer.
Important:
On Windows, it is highly recommended that ArtiSynth is not installed in a location for which any of the folder names contain spaces (i.e., Program Files). This can be important for some ArtiSynth programs to run correctly.
Once ArtiSynth is downloaded and unpacked, it should be possible to run it immediately by executing the artisynth.bat file located in <ARTISYNTH_HOME>\bin (see Section 6.1).
4 Cloning from Github
Github is a web-based repository service based on the source control management system Git. A very brief summary of Git is given in Section 10.7.
The latest ArtiSynth development version is available from Github at the URL
https://github.com/artisynth/artisynth_core.git
Users can checkout (i.e., clone) this version and then continue to update their codebase to keep it current (Section 8). In some casess, developers we work closely with can also obtain, by mutual arrangement, write access to our Github repository, allowing them to also commit changes.
Users who have a Github account combined with SSH keys may instead wish to clone using the SSH URL
git@github.com:artisynth/artisynth_core.gitFor users with repository write access, this will allow them to perform subsequent push operations without having to enter a username and password.
There are several ways to clone ArtiSynth from Github.
4.0.1 Clone using Git for Windows
Install Git for Windows (Section 10.1), and then from either Git Bash or the CMD console, enter the command
The argument <dir> is optional and gives the name of the folder into which the repository and working copy should be extracted; if omitted, the folder will be named artisynth_core.
4.0.2 Cloning using Cygwin
4.0.3 Cloning using Eclipse
If you are planning to develop ArtiSynth models in Java, and if you are planning to do this with the Eclipse IDE (Section 9), then it might be easier to do the Git clone directly in Eclipse. Follow the instructions in Section 9.2.2, using the URL https://github.com/artisynth/artisynth_core.git described above.
4.1 Downloading the libraries
Because the jar files and native libraries used by ArtiSynth are large, they are not stored in the Github repository. Instead, they must be downloaded separately. This can be done using the command updateArtisynthLibs.bat, located in <ARTISYNTH_HOME>\bin. You can execute it by double-clicking on it in a file-browser, or by opening a command console (CMD), navigating to <ARTISYNTH_HOME>, and entering the command
% bin\updateArtisynthLibs
If you have Cygwin (Section 10.3) installed, the same command is available as updateArtisynthLibs, also located in <ARTISYNTH_HOME>\bin.
5 Building ArtiSynth
If ArtiSynth has been cloned from Github, it will be necessary to build (compile) it.
If ArtiSynth was obtained as a prepackaged release, then it is precompiled and does not need to be built in order to run the built-in demos. However, it will generally be useful to build ArtiSynth anyway, particularly since any user-defined models created in Java will themselves need to be compiled.
Java compilation and code development is typically done using an integrated development environment (IDE), although it is possible (particularly on Linux and MacOS) to use external text editors and command line tools. This document describes how to build and run ArtiSynth using either the Eclipse IDE, or command line tools available in the Cygwin Unix emulator. For more information on Eclipse, see Section 9.
5.1 Building with Eclipse
If your Github clone has been done externally to Eclipse (i.e., not according to Section 4.0.3), then you need to first import ArtiSynth into Eclipse. Follow the instructions in Section 9.2.1.
Once ArtiSynth has been imported, you should be able to build it. If necessary, first open a Java perspective by choosing Window > Open Perspective > Java. The project artisynth_core (or whatever you might have named it) should appear in the Package Explorer window. To build the system, select the project in the Package Explorer window, and then choose Project > Build Project. Note that it may be necessary to deselect Build Automatically in order to enable Build Project.
5.2 Building with Cygwin
If you have Cygwin (Section 10.3) installed, ArtiSynth can also be built from a Cygwin terminal by running a make command in the top level folder. Before doing this, you need to first set the environment variables ARTISYNTH_HOME and CLASSPATH as described in Sections 10.4 and 10.4.4. ArtiSynth can then be built by executing
 > cd <ARTISYNTH_HOME>
 > make
6 Running ArtiSynth
6.1 Running using artisynth.bat
The most direct way to start ArtiSynth is to run the batch file artisynth.bat, located in <ARTISYNTH_HOME>\bin. This can be done by double-clicking on it in a file browser.
You can also create a shortcut to this batch file (by right clicking on it and selecting Create Shortcut), and then placing this shortcut in either the START menu or on the Desktop. However, the batch file itself must remain in <ARTISYNTH_HOME>\bin.
Alternatively, you can open a command console (CMD), navigate to <ARTISYNTH_HOME>, and enter the command
% bin\artisynth
It is recommended to place <ARTISYNTH_HOME>\bin in your PATH environment variable (Section 10.4), so that the console command simplifies to
% artisynth
regardless of the current directory.
Note:
If Java is installed in a non-conventional location, the system may not be able to find it and this will cause artisynth.bat to fail. To fix this, locate the folder in which java.exe resides, and let the location of this folder be called JAVA_DIR. You should then add JAVA_DIR to your system’s PATH environment variable (see Section 10.4.2).
6.2 Running using Cygwin
If you have Cygwin (Section 10.3) installed, then you can run ArtiSynth directly with the artisynth command located in <ARTISYNTH_HOME>/bin:
 > cd <ARTISYNTH_HOME>
 > bin/artisynth
If <ARTISYNTH_HOME>/bin has been placed in your PATH variable (Section 10.4), then it is sufficient to do
> artisynth
artisynth can be called with a number of options; to see these, run
> artisynth -help
6.3 Command line arguments
The artisynth command accepts command line arguments, a full list of which can be seen by running artisynth with the -help option:
% artisynth -help
Descriptions of these options appear in various places within the ArtiSynth documentation. For example, one commonly used option is -model <modelClassName>, which instructs ArtiSynth to preload a model associated with a given class name:
% artisynth -model artisynth.demos.mech.SpringMeshDemo
6.4 Running using Eclipse
Once ArtiSynth has been imported into Eclipse (and built if necessary), it should contain a launch configuration called ArtiSynth that will allow ArtiSynth to be run by choosing Run > Run.
6.5 Loading and Running Models
Once ArtiSynth starts up, you can use it to load and run models. General instructions on how to load and run models are given in the section ``Loading and Simulating Models'' of the ArtiSynth User Interface Guide.
By default, ArtiSynth comes with a number of demonstration models, which can be loaded and run as follows:
From the menu bar, Select Models > Demos. This will display a submenu of demonstration models. Choosing one will cause that model to be loaded and displayed in the viewer. Simulation of the model can then be started, paused, single-stepped, or reset using the play controls (Figure 1) located at the upper right of the ArtiSynth window frame.
Comprehensive information on exploring and interacting with models is given in the ArtiSynth User Interface Guide.
7 Installing External Models and Packages
Typically, an ArtiSynth developer will want to use external models and packages that exist outside of artisynth_core. Some of these may be obtained from external sources. For example, artisynth_models is a collection of packages that provides a variety of publicly available anatomical models, currently focussed primarily on the head and neck region. For instructions on obtaining artisynth_models, visit www.artisynth.org/models.
Installing external models and packages requires a sequence of operations similar to that for installing ArtiSynth itself:
-
1.
Download
-
2.
Build (if necessary)
-
3.
Run
7.1 Downloading
Some model and package collections, such as artisynth_models mentioned above, may be available either as prepackaged distributions, or through Git or Subversion repositories. Prepackaged distributions should be downloaded and unpacked into a desired location, while Git or Subversion checkouts may may be obtained as described in Sections 10.7 or 10.8.
Some collections maintained by ArtiSynth may contain Eclipse project settings (in an eclipseSettings.zip file in their root folder), allowing them to be imported into Eclipse, either directly from Git (Section 9.2.2) or Subversion ( Section 9.2.3), or after being obtained separately (Section 9.2.1).
7.2 Building
Collections that are obtained from Git or Subversion will need to be built (compiled).
7.2.1 Building with Eclipse
Many collections (such as artisynth_models) can be imported into Eclipse as a project and then built as described in Section 5.1.
Important: for collection projects to compile properly in Eclipse, the artisynth_core project (and any other projects they depend on) were have to be added to their build path. Details on doing this are given in Section 9.5.
7.2.2 Building from the command line
If the collection has a Makefile in its root folder, then it can be compiled from a Cygwin terminal by running make in the root folder. Before doing this, the top-level directory for the collection’s class files must to be added to the CLASSPATH environment variable (Sections 10.4 and 10.4.4). In collections maintained by ArtiSynth, this will be the directory classes, located directly under the collection root directory (e.g., artisynth_models\classes).
7.3 Running
External models are executed by running ArtiSynth itself (Section 6). However, in order to execute these models, ArtiSynth must be able to locate their associated classes. This can be arranged in three different ways:
7.3.1 Adding external classes using the Eclipse Classpath
If you are running from Eclipse, then you can make the classes of external projects visible to ArtiSynth by adding the projects to the Classpath of your ArtiSynth launch configuration, as described in Section 9.6.
7.3.2 Adding external classes using EXTCLASSPATH
Alternatively, you can make the classes of external projects visible to ArtiSynth by adding the path names of all their top-level class folders (or jar files, if relevant) to the file <ARTISYNTH_HOME>\EXTCLASSPATH (described in Section 10.6).
For example, suppose the collection artisynth_models has been placed in C:\projects\artisynth_models. The top-level class folder for this collection is located in artisynth_models\classes, and so the following entry should be placed in the EXTCLASSPATH file:
C:\projects\artisynth_models\classes
8 Updating ArtiSynth
One reason to use a clone of the latest ArtiSynth development version is to be able to migrate recent changes into your code base. When a significant update occurs, a posting is made to the ArtiSynth update log, currently located at www.artisynth.org/doc/html/updates/updates.html. Users may also be notified via the artisynth-updates email list.
Users working from Eclipse may update simply by selecting the project in the Package Explorer and selecting Team > Pull from the context menu.
Updating may also be done by issuing the
> git pull
command from within the ArtiSynth installation folder, using either Git for Windows (Section 10.1), the Cygwin shell (Section 10.3), or another Git application.
8.1 Library updates
Occasionally, a software update will be accompanied by a change in the libraries located in <ARTISYNTH_HOME>\libs. When this happens, it will be indicated on the ArtiSynth update log and appropriate instructions will be given. Sometimes, it will be necessary to explicitly update the libraries after doing the main update. This can be done by executing updateArtisynthLibs as described in Section 4.1.
9 The Eclipse IDE
Eclipse is an integrated development environment (IDE) commonly used for Java code development, and many ArtiSynth developers use it for both developing models in Java and for running the system. This section describes how to load ArtiSynth projects into Eclipse, and how to configure it for running ArtiSynth. A general introduction to Eclipse is beyond the scope of this document, but there are many Eclipse resources available online.
9.1 Obtaining Eclipse
Eclipse can be obtained from www.eclipse.org/downloads. A good version to obtain (at the time of this writing) is Eclipse IDE for Java Developers.
The Eclipse instructions described below are based on the ``Neon'' distribution, but should be largely similar for later versions.
9.2 Importing ArtiSynth projects into Eclipse
ArtiSynth projects include the core distribution (artisynth_core), the open source models collection artisynth_models (which contains human anatomy models), as well as other model and code collections maintained by the ArtiSynth team and other users.
There are several ways to import ArtiSynth projects into Eclipse. If the project has already been downloaded or checked out from a repository, then it can be imported as an external project (Section 9.2.1). Otherwise, Eclipse itself can be used to check out a project from either Git (Section 9.2.2) or Subversion (Section 9.2.3).
9.2.1 Importing external projects
ArtiSynth project repositories (including artisynth_core and artisynth_models) do not directly expose the Eclipse project files (.project, .classpath, etc.) within the distribution. Instead, these files are bundled within a top-level file eclipseSettings.zip, which must be unzipped directly into the top-level folder, as described in Section 9.2.4. This is to prevent local modifications to the project files from being propagated back to the main repositories.
Let <PROJECT_DIR> denote the top-level project folder. For the core distribution artisynth_core, this will also be <ARTISYNTH_HOME>.
-
1.
From outside Eclipse, extract the Eclispe project files by unzipping <PROJECT_DIR>\eclipseSettings.zip into <PROJECT_DIR>. For details, see Section 9.2.4.
-
2.
For artisynth_core, then from outside Eclipse, download the required jar files and native libraries as described in Section 4.1.
-
3.
From within Eclipse, choose File > Import ....
-
4.
An Import dialog will appear. Select General > Existing Projects into Workspace and click Next.
-
5.
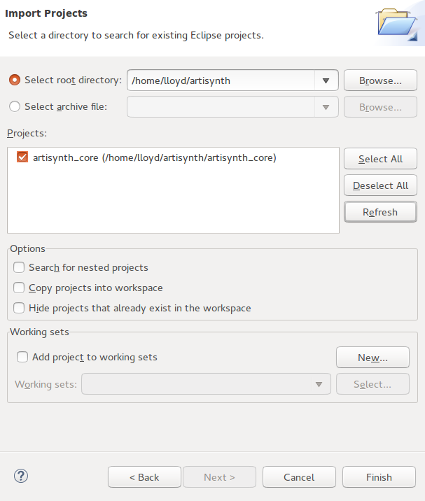
An Import Projects dialog will appear. In the field Select root directory, enter (or browse to) the parent folder of <PROJECT_DIR>. The project itself should now appear in the Projects box (Figure 2). (If other projects are contained in the parent directory, these will appear as well.) Make sure that the desired project is selected and then click Finish.
If Eclipse complains that "No projects are found to import", or does not otherwise show the project as available for import, then most likely the <PROJECT_DIR> folder does not contain a .project file. This can happen if eclipseSettings.zip was not properly unzipped into <PROJECT_DIR>.
9.2.2 Importing from a Git repository
Recent versions of Eclipse contain integrated support for Git, and so importing a project directly from a Git repository is relatively easy.
Because ArtiSynth GIT repositories do not directly expose Eclipse project files, the standard import method of
File > Import... > Git > Projects from Git
will not work completely. Instead, one must first clone the Git repository, and then import the project folder as described in Section 9.2.1.
To clone a Git repository from within Eclipse;
-
1.
Choose Window > Show View > Other ... > Git > Git Repositories from the main menu to open a Git Repositories view window.
-
2.
Within the Git Repositories window, choose the button (or pull down menu item) that says Clone a repository.
-
3.
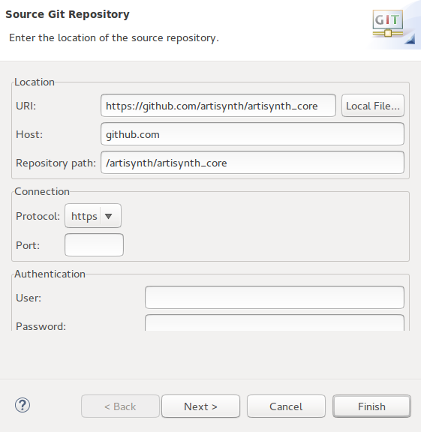
A Source Git Repository dialog will appear (Figure 3, left). Enter the URL for the repository. For ArtiSynth itself, this is https://github.com/artisynth/artisynth_core.git). The URI field is coupled to some of the others: you can either fill in the URI field directly, or enter the individual URI components in the Host, Repository path, and Protocol fields. Also, if the repository has read access restrictions, it will generally be necessary to specify a user name and password in the Authentication fields. After entering the required information, click Next.
-
4.
A Branch Selection dialog may appear. If it does, select only the master branch, and then click Next.
-
5.
A Local Destination dialog will appear (Figure 3, right). In the Directory field, enter the path of the local folder, which will contain both the cloned repository and the working copy. For ArtiSynth itself, this will also be the ArtiSynth home folder (<ARTISYNTH_HOME>). After entering the folder information, click Finish.
Finally, import the local folder into Eclipse as a project by following the steps in Section 9.2.1, using the local folder parent as the ``root directory''.
 |
 |
9.2.3 Importing from a Subversion repository
If Eclipse has a Subversion plug-in installed (Section 9.7), you may import an ArtiSynth project by checking it out directly from the repository located by the project’s Subversion_URL. For the core ArtiSynth distribution, this is
https://svn.artisynth.org/svn/artisynth_core/trunk
Other projects will have different URLs.
The following instructions assume the Subversive plug-in.
-
1.
Choose File > Import from the main menu, select SVN > Project from SVN and click Next.
-
2.
You now need to specify a repository location, as specified by a Subversion_URL. If you’ve previously done an SVN checkout, a menu will appear allowing you to select a previously used URL. If one of these is sufficient, select it and click Next to go to Step 4. Otherwise, select Create a new repository location and click Next to enter a repository dialog. If no previous locations are known this dialog will appear automatically.
-
3.
If you are specifying a new location in the repository dialog:
-
–
Under the General tab, enter the Subversion_URL in the URL box. If you are just checking out the trunk of the repository (i.e., if your Subversion URL ends in /trunk), then you should omit the final /trunk since this is selectable in Step 4.
-
–
If you are checking out a repository that is not available for anonymous access, or if you need write access to the repository, enter your ArtiSynth User ID and Password (which you will have obtained from us separately) in the Authentication section of the dialog. You will probably want to check Save authentication as well.
-
–
Click Next.
-
–
-
4.
In the Select Resource dialog, use the URL selector box to select the full URL to be used for the checkout. If you are just checking out the trunk of the repository, then choose Subversion_URL/trunk which should be available as a selection.
-
5.
Click Finish
-
6.
In the Check Out As dialog, select Check out as a project with name specified, adjust the project name if desired, and click Next.
-
7.
Specify the location for the check out. If you leave Use default workspace location selected, this will be workspace/project_name, where workspace is the Eclipse workspace folder and project_name is the project name selected in the previous step. Otherwise, you can specify an explicit checkout location (which does not have to be located in the Eclipse workspace). For ArtiSynth core checkouts, the project name is typically artisynth_core and the the checkout location will become the ArtiSynth install folder <ARTISYNTH_HOME>.
-
8.
Click Finish.
-
9.
If necessary, open a Java perspective by choosing Window > Open Perspective > Java. The project should appear in the Package Explorer window.
-
10.
From outside Eclipse, install the Eclipse project files by unzipping <PROJECT_DIR>\eclipseSettings.zip into <PROJECT_DIR>. For details, see Section 9.2.4.
-
11.
From outside Eclipse, download the required jar files and native libraries as described in Section 4.1.
-
12.
Finally, load the new settings into the project by selecting the project in the Package Explore window and selecting Refresh from the context menu.
9.2.4 Installing project files
Distributions of artisynth_core and artisynth_models, as well as some other project repositories, contain their eclipse project files bundled in the zip file eclipseSettings.zip. The reason for not placing project files directly under repository control is to prevent local changes to them from being propagated back into the repository.
Let <PROJECT_DIR> denote the top-level project folder. On Windows, project files can be extracted from within the file browser. Double click on eclipseSettings.zip and extract the files into <PROJECT_DIR>. This will create the files .project and .classpath, along with the folder .settings, in <PROJECT_DIR>. In the case of artisynth_core, it will also create the file ArtiSynth.launch containing the default launch configuration.
Note: if unzip queries about overwriting .project, answer [y]es.
9.3 Configuring environment variables
When running ArtiSynth from Eclipse, it may be useful to set certain environment variables that affect its operation. Directions on setting the environment variables are given in Section 9.3.1, and descriptions of the variables themselves may be found in Section 10.4.
Some variables that are commonly set within Eclipse include:
-
•
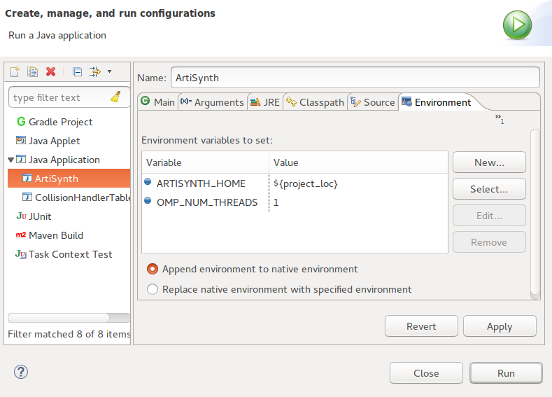
ARTISYNTH_HOME: This should be set to <ARTISYNTH_HOME>. The ArtiSynth launch configuration in artisynth_core achieves this by settingARTISYNTH_HOME to the built-in Eclipse variable ${project_loc}. However, for launch configurations defined outside of artisynth_core, it may be necessary to set this variable explicitly.
-
•
OMP_NUM_THREADS: Specifies the maximum number of processor cores available for multicore execution.
-
•
ARTISYNTH_PATH: A list of folders, separated by semi-colons ";", which ArtiSynth uses to search for configuration files. See Section 10.4.
If any of the above variables have already been set externally in Windows (Sections 10.4.1 and 10.4.3), such that they are visible to Eclipse at start-up, then they do not need to be set in the launch configuration.
9.3.1 Setting environment variables
To set environment variables within Eclipse:
-
1.
Open a java perspective if necessary by choosing Window > Open Perspective > Java.
-
2.
Select the ArtiSynth project in the Package Explorer form.
-
3.
Choose Run > Run Configurations... to open the Run Configurations window.
-
4.
In the left panel, under Java Application, select ArtiSynth.
-
5.
In the right panel, select the Environment tab.
-
6.
To create a new environment variable, click the New button and enter the name and value in the dialog box. See Figure 4.
-
7.
When finished, make sure that Append environment to native environment is selected, and click Apply.
9.4 Command line and JVM arguments
As described in Section 6.3, the artisynth command accepts command line arguments. To invoke these when running from Eclipse, it is necessary to set the desired arguments in the launch configuration, as described below.
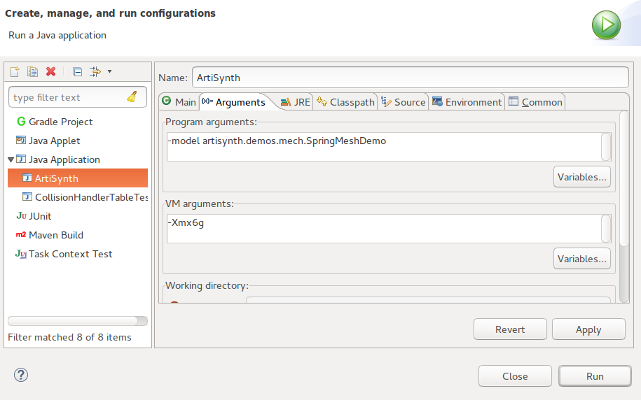
Sometimes it may also be necessary to set JVM arguments, which control the Java virtual machine running ArtiSynth. An example of such an argument is -Xmx, which can be used to increase the maximum amount of memory available to the application. For example, -Xmx6g sets the maximum amount of memory to 6 gigabytes.
9.4.1 Setting command line and JVM arguments
To set command line arguments for your Eclipse application:
-
1.
Open a java perspective if necessary by choosing Window > Open Perspective > Java.
-
2.
Select the ArtiSynth project in the Package Explorer form.
-
3.
Choose Run > Run Configurations... to open the Run Configurations window.
-
4.
In the left panel, under Java Application, select ArtiSynth.
-
5.
In the right panel, select the Arguments tab.
-
6.
Program arguments (which are passed directly to ArtiSynth) should be specified in the Program arguments box. JVM arguments should be specified in the VM arguments box. See Figure 5.
-
7.
When finished, click Close.
9.5 Adding projects to the build path
A project imported into Eclipse may depend on the packages and libraries found in other projects to compile properly. For example, ArtiSynth applications which are external to artisynth_core will nonetheless depend on artisynth_core. To ensure proper compilation, project dependencies should be added to each dependent project’s build path.
-
1.
Select the dependent project in the Package Explorer form.
-
2.
Right click and choose Build Path > Configure Build Path...
-
3.
In the right panel, select the Projects tab.
-
4.
Click the Add button, select the project dependencies, and click OK
-
5.
Click OK in the Java Build Path panel
9.6 Adding projects to the ArtiSynth launch configuration
The classes of external projects can be made visible to ArtiSynth by adding the projects to the Classpath of the ArtiSynth launch configuration.
-
1.
From the main menu, choose Run > Run Configurations... to open a Run Configurations dialog.
-
2.
In the left panel, under Java Application, select your ArtiSynth launch configuration (the default one is called ArtiSynth). This may already be selected when you open the panel.
-
3.
In the right panel, select the Classpath tab.
-
4.
In the Classpath: window, select User Entries, and then click the Add Projects button.
-
5.
In the Project Selection dialog, select the external projects that you wish to add. Generally, the boxes Add exported entries ... and Add required projects ... can be unchecked. Click OK.
-
6.
Close the Run Configurations dialog.
9.7 Installing a Subversion plug-in
In order to work with Subversion from within Eclipse, either to check out ArtiSynth from the repository, or to update or commit changes, it is necessary to use a Subversion plug-in. First, check to see if your version of Eclipse contains an Subversion plug-in:
Open an import panel using File > Import..., and then look for SVN in the set of available import sources. If you don’t see SVN listed, it will be necessary to install a plug-in.
We recommend the Eclipse-supported Subversive plug-in, but if this proves difficult for any reason, there are other options, such as Subclipse, currently obtainable from subclipse.tigris.org.
Instructions for installing Subversive can be obtained at www.eclipse.org/subversive/installation-instructions.php.
One way to install Subversive is through the Eclipse Marketplace. If you have an older version of Eclipse that doesn’t have Marketplace, you may be able to obtain it from www.eclipse.org/mpc. To access the Marketplace, click Help > Eclipse Marketplace. Once the available applications have been displayed, type Subversive into the Find box in the top-left corner of the Marketplace window. Navigate to the package labeled Subversive - SVN Team Provider and click Install. On the Confirm Selected Features screen, ensure all boxes are checked and click the button labeled Confirm >. Restart Eclipse when prompted.
One more step is now necessary. Re-open Eclipse, and you should be prompted to choose an SVN connector in the start menu. SVN connectors interface Subversive to the SVN server, and are OS and server-specific. A recommended SVN Connector will be pre-selected for downloading; this is most likely the one you need.
If Eclipse did not prompt you to choose a connector when it restarted, you can install SVN connectors separately (thanks to bmaupin at Stackoverflow for this information):
- 1.
-
2.
Under the latest Release, copy the Subversive SVN Connectors URL. The current URL for Eclipse 4.3 Kepler is http://community.polarion.com/projects/subversive/download/eclipse/3.0/kepler-site.
-
3.
In Eclipse, go to Help > Install New Software... and click Add...
-
4.
Copy the URL for the Subversive SVN Connectors into the Location box and click OK
-
5.
Check Subversive SVN Connectors, click Next, and then follow the instructions to complete installation.
If in doubt about the connector you need, you can install multiple ones, and then adjust the one Subversive actually uses by going to Windows > Preferences, opening Team > SVN, and then opening the SVN Connector tab.
9.8 Preventing excessive resource copying
By default, ArtiSynth classes are built in a directory tree (<PROJECT_DIR>\classes) that is separate from the source tree (<PROJECT_DIR>\src), where <PROJECT_DIR> denotes the project root folder and is <ARTISYNTH_HOME> for ArtiSynth itself. That means that Eclipse will try to copy all non-Java files and folders from the source tree into the build tree. For ArtiSynth, this is excessive, and results in many files being copied that don’t need to be, since ArtiSynth looks for resources in the source tree anyway.
It is possible to inhibit most of this copying:
-
1.
Choose Window > Preferences (or Eclipse > Preferences).
-
2.
Select Java > Compiler > Building.
-
3.
Open Output folder, and in the box entitled Filter resources, enter the string:
Makefile,*.a*,*.b*,*.c,*.cc,*.cxx,*.e*,*.g*,*.h*,*.i*,*.m*,*.n*,*.o*,*.r*,*.s*,*.t*
That should filter out the copying of most non-java files.
Or, to prevent copying any resource, simply enter:
10 Additional Information
10.1 Git for Windows
A version of Git for Windows can be installed from git-scm.com/download.
It installs a version of Git Bash for that can be used for entering Git commands. While going through the install steps, there is an option to select between:
-
1.
Use Git from Git Bash only
-
2.
Use Git from the Windows Command Prompt
-
3.
Use Git and optional Unix tools from the Windows Command Prompt
Option 2 (Git from CMD) is often fine for most users, and allows them to run all git commands directly from a command console CMD. There are other options for setting the default editor, the default console to open when starting Git Bash, etc., but the defaults should work well in most cases.
10.2 The TortoiseSVN Client
As mentioned above, some ArtiSynth models may be distributed via Subversion (SVN), and access to these will require an SVN client program. A popular SVN client for Windows is TortoiseSVN, which can be acquired from tortoisesvn.net. On that website, navigate to Downloads and then select the package appropriate for your operating system (which presumably will be 64-bits).
Once downloaded, run the MSI installer and follow the instructions in the installer. When the download completes, right-clicking in any file browser in Windows should now present you with SVN version control options, analogous to the command line instructions discussed in other parts of the documentation. We will briefly discuss here the three most common operations:
- Checking out a repository
-
To check out an SVN repository with TortoiseSVN, right-click in any file exploration window and select SVN Checkout... from the context menu. The current directory will be the default directory for the Checkout directory field, and the Subversion_URL can be selected in the URL of repository field. It is recommended that other fields remain as their default values.
- Updating a working copy
-
While inside a working copy of a repository in a file browser window, updating that repository is as simple as right-clicking and selecting SVN Update.
- Committing changes
-
Users which have write-access to a Subversion repository may commit changes that they have made. Right-click in a file browser window inside a working copy of a repository and select Commit.... Write a commit message and the select OK.
10.3 Cygwin
Cygwin provides Windows users with a Linux-like, shell-based command environment. Its provides useful tools and enables ArtiSynth users to employ all the script-based commands in <ARTISYNTH_HOME>\bin, as well as various Makefile commands.
Cygwin can be downloaded from www.cygwin.com. Run the executable that was just downloaded (setup.exe) to begin installation. After selecting a download source, an install directory, a package directory, an internet connection, and a download site, the installer will display a list of packages which the user can select for download. Normally, a default set of packages is already selected for installation. It is advisable to install these packages to ensure that Cygwin retains its basic capabilities. It is also recommended that you select the following additional packages:
-
•
archive
-
•
git, svn, make (located under devel)
-
•
python (located under interpreters).
-
•
openssh (located under net)
If you are planning to compile C/C++ code, you may also want to install the various gcc and gdb packages (located under devel).
10.4 Environment variables
This is a glossary of all the environment variables that are associated with building or running ArtiSynth. Often, the system can detect and set appropriate values for these automatically. In other cases, as noted in the above documentation, it may be necessary or desirable for the user to set them explicitly.
- ARTISYNTH_HOME
-
The path name of the ArtiSynth installation folder.
- ARTISYNTH_PATH
-
A list of folders, separated by semi-colons ";", which ArtiSynth uses to search for configuration files such as .artisyntInit or .demoModels. A typical setting for ARTISYNTH_PATH consists of the current folder (indicated by "."), the user’s home folder, and the ArtiSynth installation folder. If ARTISYNTH_PATH is not defined explicitly in the user’s environment, ArtiSynth assumes an implicit path consisting of the folder sequence just described.
- CLASSPATH
-
A list of folders and/or jar files, separated by semi-colons ";", which Java uses to locate its class files. This variable should be set to include <ARTISYNTH_HOME>\classes and <ARTISYNTH_HOME>\lib\* (the latter uses the wildcard * to specify all the jar files in <ARTISYNTH_HOME>\lib).
- PATH
-
A list of folders, separated by semi-colons ";", which the operating system uses to locate executable programs and applications. This should be set to include <ARTISYNTH_HOME>\bin and <ARTISYNTH_HOME>\lib\Windows64. This variable is described in detail in Section 10.4.2.
- OMP_NUM_THREADS
-
Specifies the maximum number of processor cores that are available for multicore execution. Setting this variable to the maximum number of cores on your machine can significantly increase performance.
Note that settings for most of the above can be derived from the value of ARTISYNTH_HOME.
10.4.1 Setting environment variables
On Windows, a user can view, set, or change environment variables via the following steps:
-
1.
Right-click My Computer, and then click Properties.
-
2.
Click the Advanced tab.
-
3.
Click Environment variables.
-
4.
Choose one of the following options:
-
–
Click New to add a new variable name and value.
-
–
Click an existing variable, and then Edit to change its name or value.
-
–
Click an existing variable, and then Delete to remove it.
-
–
Variable settings can reference other environment variables, by surrounding them with percent signs, as in %VARIABLE_NAME%. For example, suppose you already have an environment variable HOME that gives the location of your home folder, and your ArtiSynth distribution is located in packages\artisynth_core relative to your home folder. Then the environment variable ARTISYNTH_HOME can be specified as
%HOME%\packages\artisynth_core
10.4.2 The PATH environment variable
The special environment variable PATH tells the system where to find applications and programs. It consists of a list of folder names separated by semicolons ";". If you have applications or programs that reside in non-standard locations, you can enable the system to find them by adding their containing folder to the existing PATH value. For example, the programs associated with ArtiSynth reside in <ARTISYNTH_HOME>\bin. If ARTISYNTH_HOME has the value "C:\packages\artisynth_core", then the ArtiSynth programs can be made visible to the system by setting PATH to
%PATH%;c:\packages\artisynth_core\bin
Alternatively, if the ArtiSynth home location is described by the environment variable ARTISYNTH_HOME, then the above can be expressed as
%PATH%;%ARTISYNTH_HOME%\bin
Note that most programs and applications need to be restarted in order to get them to notice changes to the PATH.
10.4.3 Typical environment settings
Typical settings for the environment variables described above might look like this:
10.4.4 Cygwin environment settings
When running a Cygwin terminal, it is possible to set environment variables in the startup script for the terminal’s shell. Assuming that this shell is bash, then the environment settings described in 10.4.3 can be set by inserting the following into one of bash’s initialization files (typically ~/.bashrc):
Note that even on Cygwin, the environment variables ARTISYNTH_HOME, ARTISYNTH_PATH, and CLASSPATH should be set using Windows path conventions. That is because they may not necessarily be invoked in a Unix-like context.
10.5 ArtiSynth Libraries
ArtiSynth uses a set of libraries located under <ARTISYNTH_HOME>\lib. These include a number of jar files, plus native libraries located in architecture-specific sub-folders (Windows64 for 64-bit Windows systems).
As described in Section 4.1, these libraries need to be downloaded automatically if the system is obtained from the Github repository. The required libraries are listed in the file <ARTISYNTH_HOME>\lib\LIBRARIES. This file is checked into the repository, so that the system can always determine what libraries are needed for a particular checkout version.
Occasionally the libraries are changed or upgraded. If you run ArtiSynth with the -updateLibs command line option, the program will ensure that not only are all the required libraries present, but that they also match the latest versions on the ArtiSynth server.
10.6 The EXTCLASSPATH File
In order to run an external model or package in ArtiSynth, all class paths (i.e., class folders or jar files) associated with those external classes must be made visible to ArtiSynth. One way to do this is to list these class paths as entries in the text file EXTCLASSPATH, located in <ARTISYNTH_HOME>.
To add class paths to EXTCLASSPATH, open it using a standard text editor (such as Notepad) and add each required path. For clarity, each path is typically added on a separate line. However, multiple paths can be added on the same line if they are separated by the path separator character used for that OS.
The syntax rules for EXTCLASSPATH are:
-
1.
Class path entries on the same line should be separated by a path separator character (a semi-colon ’;’ for Windows and a colon ’:’ for MacOS and Linux).
-
2.
The # character comments out all remaining characters to the end of line.
-
3.
The $ character can be used to expand environment variables.
-
4.
Any spaces present will be included in the path name.
An example EXTCLASSPATH might look like this:
C:\research\artisynth_models\classes
C:\research\models\special.jar
$HOME\projects\crazy\classes
10.7 Quick Git Summary
Git is a distributed source control management (SCM) system that is widely used in the software industry. A full discussion of Git is beyond the scope of this document, but a large literature is available online. Generally, when you clone a Git repository, you create a local copy of that repository on your machine, along with a checked out working folder containing the most recent version of the code (which is referred to as the HEAD).
Unlike client/server SCMs, Git is distributed, with users maintaining their own private copies of a repository. This allows a great deal of flexibility in usage, but also adds an extra ``layer'' to the workflow: when you ``checkout'' from a repository or ``commit'' to it, you do so with respect to your own local copy of that repository, not the original (origin) repository from which you performed the original clone. The process of merging in changes from the origin to the local repository is known as ``pulling'', while committing changes from the local repository back to the origin is known as ``pushing''.
There is also another layer of interaction when you commit changes to the local repository: you first add them to a staging area (also known as the ``index''), and then commit them using the commit command.
A very simple workflow for a typical ArtiSynth user is summarized below. The actions are described in command-line form, but the same commands can generally be issued through Eclipse or other interfaces. First, clone the most recent version of the ArtiSynth repository on Github:
git clone https://github.com/artisynth/artisynth_core.git [<dir>]
This will create a local copy of the Github repository, along with a checked out ``working copy'', in the folder specified by <dir>, or in artisynth_core if <dir> is omitted. The repository itself will be located in a sub-folder called .git.
Other Git repositories can be cloned in a similar manner. If the repository has read access restrictions, then when performing a checkout it may also be necessary to specify a user name for which the repository has granted read access. This is typically done by embedding the user name in the URL, as in (for example) https://user@host.xz/path/to/repo.git.
Later, to fetch the latest updates from the Github repository and merge them into your working copy, then from within the working copy directory you can do
git pull
If you make changes to some files in your working copy and wish to commit these to your local repository, you first add (or remove them) from the staging area using commands such as:
  git add <fileName>    # add a new (or modified) file
  git add *             # add all files
  git rm <fileName>     # remove a file
and then commit them to your local repository using
git commit -m "commit message"
Note that you can also add modified files and commit them using the single command
git commit -m -a "commit message"
To see the current status of the files in your working copy and the staging area, use the command
git status
and to see the commit history for particular files or folders, use
git log [ <filename> ... ]
Finally, to push your changes back to the Github repository (assuming you have permission do so), you would do so using the command
git push origin master
Note that the above commands all have various options not mentioned. There are also numerous topics that haven’t been discussed, including the creation and merging of branches, but there are many useful online resources that describe these in detail. Some current references include
   https://git-scm.com/docs
   http://rogerdudler.github.io/git-guide
10.8 Quick Subversion Summary
Subversion is a client/server source control management (SCM) system that is widely used in the software industry. A full discussion of Subversion is beyond the scope of this document, but a large literature is available online.
Subversion allows you to check out a codebase from a (often remote) repository into a local working copy, update recent changes from the repository into the working copy, and (if one has the appropriate permissions) commit local changes back into to repository.
A Subversion client application is used to access both Subversion repositories and local working copies. The remainder of this discussion will assume use of the command-line client svn, although other clients are available, including TortoiseSVN for Windows (Section 10.2) and the Subversion plug-ins for Eclipse (Section 9.7).
Some ArtiSynth models collections and code extensions are distributed through Subversion, including the artisynth_projects package used by some collaborators. A very simple workflow involving one of these is summarized below.
First, check out the most recent version from the repository, using the repository’s URL. For example, the URL for artisynth_projects is https://svn.artisynth.org/svn/artisynth_projects, and the associated checkout command is
svn checkout https://svn.artisynth.org/svn/artisynth_projects/trunk [<dir>]
This will create a local working copy of the ``trunk'' branch of artisynth_projects in the folder specified by <dir>, or in artisynth_projects if <dir> is omitted. Local repository information is stored in a sub-folder called .svn.
If the SVN repository has read access restrictions (which artisynth_projects actually does), then when performing a checkout it may also be necessary to specify a user name or email address for which the repository has granted read access. This may be done with the --username option. The user will also typically be prompted for an access password.
Note:
If you omit the trailing /trunk from the Subversion URL, then the checkout will contain the entire Subversion directory structure, including the subdirectories trunk, branches, and tags, which is generally not needed by most users.
Later, to fetch the latest updates from the repository and merge them into your working copy, from within the local folder, would you simply do
svn update
If you make changes to some files in your working copy and wish to commit these back to the repository (assuming you have the necessary permissions), then you can issue the command
svn commit -m "commit message"
To add or remove files from the repository, one may use the commands
  svn add <fileName> ...     # add files
  svn delete <fileName> ...  # delete files
prior to performing the commit.
To see the current status of the files in your working copy, use the command
svn status
and to see the commit history for particular files or folders, use
svn log [ <filename> ... ]
Note that the above commands all have various options not mentioned. There are also numerous topics that haven’t been discussed, including the creation and merging of branches, but there are many useful online resources that describe these in detail. The most comprehensive is probably the Subversion ``Redbook''.
![[LOGO]](data:image/png;base64,iVBORw0KGgoAAAANSUhEUgAAAAsAAAAOCAYAAAD5YeaVAAAAAXNSR0IArs4c6QAAAAZiS0dEAP8A/wD/oL2nkwAAAAlwSFlzAAALEwAACxMBAJqcGAAAAAd0SU1FB9wKExQZLWTEaOUAAAAddEVYdENvbW1lbnQAQ3JlYXRlZCB3aXRoIFRoZSBHSU1Q72QlbgAAAdpJREFUKM9tkL+L2nAARz9fPZNCKFapUn8kyI0e4iRHSR1Kb8ng0lJw6FYHFwv2LwhOpcWxTjeUunYqOmqd6hEoRDhtDWdA8ApRYsSUCDHNt5ul13vz4w0vWCgUnnEc975arX6ORqN3VqtVZbfbTQC4uEHANM3jSqXymFI6yWazP2KxWAXAL9zCUa1Wy2tXVxheKA9YNoR8Pt+aTqe4FVVVvz05O6MBhqUIBGk8Hn8HAOVy+T+XLJfLS4ZhTiRJgqIoVBRFIoric47jPnmeB1mW/9rr9ZpSSn3Lsmir1fJZlqWlUonKsvwWwD8ymc/nXwVBeLjf7xEKhdBut9Hr9WgmkyGEkJwsy5eHG5vN5g0AKIoCAEgkEkin0wQAfN9/cXPdheu6P33fBwB4ngcAcByHJpPJl+fn54mD3Gg0NrquXxeLRQAAwzAYj8cwTZPwPH9/sVg8PXweDAauqqr2cDjEer1GJBLBZDJBs9mE4zjwfZ85lAGg2+06hmGgXq+j3+/DsixYlgVN03a9Xu8jgCNCyIegIAgx13Vfd7vdu+FweG8YRkjXdWy329+dTgeSJD3ieZ7RNO0VAXAPwDEAO5VKndi2fWrb9jWl9Esul6PZbDY9Go1OZ7PZ9z/lyuD3OozU2wAAAABJRU5ErkJggg==)