13 The Eclipse IDE
Eclipse is an integrated development environment (IDE) commonly used for Java code development, and many ArtiSynth developers use it for both developing models in Java and for running the system. This section describes how to install Eclipse and provides some other information relevant to ArtiSynth users. A general introduction to Eclipse is beyond the scope of this document, but there are many Eclipse resources available online.
13.1 Installing Eclipse
This document describes specifically the installation of Eclipse 2020-12; other versions should be similar.
Eclipse can be downloaded from www.eclipse.org/downloads/packages. From this page, choose “Eclipse IDE for Java Developers”, Linux x86_64, which will download the file
eclipse-java-2020-12-R-linux-gtk-x86_64.tar.gz
Untar this file into any desired install location, and then run the eclipse executable in the top-level directory. A dialog will appear, asking you to select a workspace directory (Figure 4). This is where Eclipse settings and project information will be stored. Unless you have a another Eclipse already installed, the default location should be fine. (Remember also to check the “Use this as the default ...” box so that this query won’t appear every time you open Eclipse.) Next, click Launch. A welcome page will appear; close this. A “donate” panel may also appear; close this too. You should then see an empty Eclipse display, similar to Figure 5.
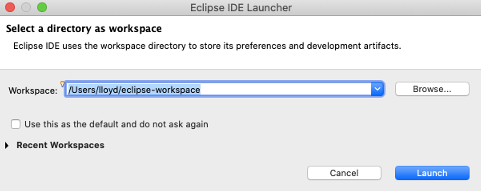
This is where Eclipse settings and project information will be stored. Unless you have a another Eclipse already installed, the default location should be fine. (Remember also to check the “Use this as the default ...” box so that this query won’t appear every time you open Eclipse.) Next, click Launch. A welcome page will appear; close this. A “donate” panel may also appear; close this too. You should then see an Emily Eclipse display, similar to Figure 5.
13.1.1 Setting Eclipse to use the correct Java JDK
Newer versions of Eclipse come with their own version of Java. However, if we are using our own JDK (as described in Section 4), we need to configure Eclipse to use that instead.
Eclipse can be configured to use your JDK as follows:
-
1.
From the main menu, select “Window > Preferences”.
-
2.
A Preferences dialog will open. In the left panel, select “Java > Installed JREs”, which will open an Installed JREs panel. Click the Add... button at the right.
-
3.
A JRE Type dialog will appear. Leave “Standard VM” selected in the dialog and click Next.
-
4.
A JRE Definition dialog will appear. In the “JRE home” field at the top, enter the installation directory for your JDK.
-
5.
Click Finish. Your Java JDK will now show up in the list of installed JREs. Click on the left box to select it; ignore any warnings about Java 15 compatibility.
-
6.
Finish by clicking the “Apply and Close” button at the bottom of the Preferences dialog.
13.1.2 Preventing excess resource copying
By default, ArtiSynth classes are placed in file tree located beneath <ARTISYNTH_HOME>/classes that is separate from the source tree located beneath <ARTISYNTH_HOME>/src. That means that Eclipse will try to copy all non-Java files and directories from the source tree into the build tree. For ArtiSynth, this is excessive, and results in many files being copied that don’t need to be, since ArtiSynth looks for resources in the source tree anyway.
To prevent this copying:
-
1.
Choose “Window > Preferences”.
-
2.
Select Java > Compiler > Building.
-
3.
Open Output folder, and in the box entitled Filter resources, enter the single character ‘*’.
13.2 Importing external projects
Let <PROJECT_DIR> denote the top-level directory of the project to be imported. (In the case of artisynth_core, this will also be <ARTISYNTH_HOME>.) Assuming that <PROJECT_DIR> contains an Eclipse .project file, you can import it into Eclipse as follows:
-
1.
From within Eclipse, choose “File > Import ...”.
-
2.
An Import dialog will appear. Select General > Existing Projects into Workspace and click Next.
-
3.
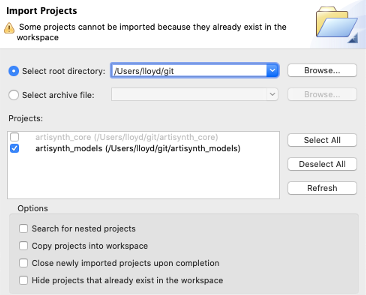
An Import Projects dialog will appear. In the field Select root directory, enter (or browse to) the parent directory of <PROJECT_DIR>. The project itself should now appear in the Projects box (Figure 6). (If other projects are contained in the parent directory, these will appear as well.) Make sure that the desired project is selected and then click Finish.
If Eclipse complains that "No projects are found to import", or does not otherwise show the project as available for import, then most likely the <PROJECT_DIR> directory does not contain a .project file.
13.3 Configuring environment variables
While it is generally not necessary to set environment variables in Eclipse, it may be useful to do this on occasion to control certain aspects of ArtiSynth’s operation. Directions on setting the environment variables are given in Section 13.3.1, and descriptions of the variables themselves may be found in Section 14.2.
If any environment variables have already been set externally in Linux (Section 14.2), such that they are visible to Eclipse at start-up, then they do not need to be set in the launch configuration.
13.3.1 Setting environment variables
To set environment variables within Eclipse:
-
1.
Open a java perspective if necessary by choosing Window > Open Perspective > Java.
-
2.
Select the ArtiSynth project in the Package Explorer form.
-
3.
Choose “Run > Run Configurations...” to open the Run Configurations window.
-
4.
In the left panel, under Java Application, select the launch configuration (the default is named ArtiSynth).
-
5.
In the right panel, select the Environment tab.
-
6.
To create a new environment variable, click the New button and enter the name and value in the dialog box.
-
7.
When finished, make sure that Append environment to native environment is selected, and click Apply.
13.4 Command line and JVM arguments
As described in Section 7.4, the artisynth command accepts command line arguments. To invoke these when running from Eclipse, it is necessary to set the desired arguments in the launch configuration, as described below.
Sometimes it may also be necessary to set JVM arguments, which control the Java virtual machine running ArtiSynth. An example of such an argument is -Xmx, which can be used to increase the maximum amount of memory available to the application. For example, -Xmx6g sets the maximum amount of memory to 6 gigabytes.
13.4.1 Setting command line and JVM arguments
To set command line arguments for your Eclipse application:
-
1.
Open a java perspective if necessary by choosing Window > Open Perspective > Java.
-
2.
Select the ArtiSynth project in the Package Explorer form.
-
3.
Choose “Run > Run Configurations...” to open the Run Configurations window.
-
4.
In the left panel, under Java Application, select the launch configuration (the default is named ArtiSynth).
-
5.
In the right panel, select the Arguments tab.
-
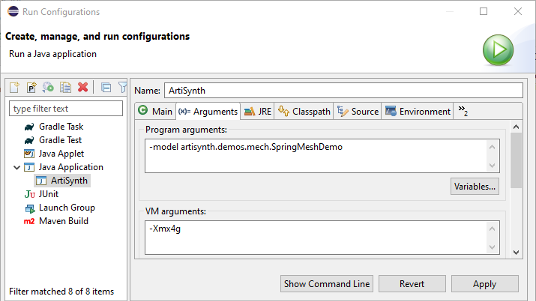
6.
Program arguments (which are passed directly to ArtiSynth) should be specified in the Program arguments box. JVM arguments should be specified in the VM arguments box. See Figure 7.
-
7.
When finished, click Close.
13.5 Adding projects to the build path
A project imported into Eclipse may depend on the packages and libraries found in other projects to compile properly. For example, ArtiSynth applications which are external to artisynth_core will nonetheless depend on artisynth_core. To ensure proper compilation, project dependencies should be added to each dependent project’s build path.
-
1.
Select the dependent project in the Package Explorer form.
-
2.
Right click and choose “Build Path > Configure Build Path...”
-
3.
In the right panel, select the Projects tab.
-
4.
Click the Add button, select the project dependencies, and click OK
-
5.
Click OK in the Java Build Path panel
13.6 Adding projects to the ArtiSynth launch configuration
The classes of external projects can be made visible to ArtiSynth by adding the projects themselves to the Classpath of the ArtiSynth launch configuration.
-
1.
From the main menu, choose “Run > Run Configurations...” to open a Run Configurations dialog.
-
2.
In the left panel, under Java Application, select your ArtiSynth launch configuration (the default one is called ArtiSynth). This may already be selected when you open the panel.
-
3.
In the right panel, select the Classpath tab.
-
4.
In the Classpath window, select User Entries, and then click the Add Projects button.
-
5.
In the Project Selection dialog, select the external projects that you wish to add. Generally, the boxes “Add exported entries ...” and “Add required projects ...” can be unchecked. Click OK.
-
6.
Close the Run Configurations dialog.
![[LOGO]](data:image/png;base64,iVBORw0KGgoAAAANSUhEUgAAAAsAAAAOCAYAAAD5YeaVAAAAAXNSR0IArs4c6QAAAAZiS0dEAP8A/wD/oL2nkwAAAAlwSFlzAAALEwAACxMBAJqcGAAAAAd0SU1FB9wKExQZLWTEaOUAAAAddEVYdENvbW1lbnQAQ3JlYXRlZCB3aXRoIFRoZSBHSU1Q72QlbgAAAdpJREFUKM9tkL+L2nAARz9fPZNCKFapUn8kyI0e4iRHSR1Kb8ng0lJw6FYHFwv2LwhOpcWxTjeUunYqOmqd6hEoRDhtDWdA8ApRYsSUCDHNt5ul13vz4w0vWCgUnnEc975arX6ORqN3VqtVZbfbTQC4uEHANM3jSqXymFI6yWazP2KxWAXAL9zCUa1Wy2tXVxheKA9YNoR8Pt+aTqe4FVVVvz05O6MBhqUIBGk8Hn8HAOVy+T+XLJfLS4ZhTiRJgqIoVBRFIoric47jPnmeB1mW/9rr9ZpSSn3Lsmir1fJZlqWlUonKsvwWwD8ymc/nXwVBeLjf7xEKhdBut9Hr9WgmkyGEkJwsy5eHG5vN5g0AKIoCAEgkEkin0wQAfN9/cXPdheu6P33fBwB4ngcAcByHJpPJl+fn54mD3Gg0NrquXxeLRQAAwzAYj8cwTZPwPH9/sVg8PXweDAauqqr2cDjEer1GJBLBZDJBs9mE4zjwfZ85lAGg2+06hmGgXq+j3+/DsixYlgVN03a9Xu8jgCNCyIegIAgx13Vfd7vdu+FweG8YRkjXdWy329+dTgeSJD3ieZ7RNO0VAXAPwDEAO5VKndi2fWrb9jWl9Esul6PZbDY9Go1OZ7PZ9z/lyuD3OozU2wAAAABJRU5ErkJggg==)