6 Installing from GitHub
For most users doing active modeling work, we recommend installing the current ArtiSynth development version from GitHub, which will provide ongoing access to updates and bug fixes. GitHub is a web-based repository service based on the source control management system Git. A very brief summary of Git is given in Section 14.5.
ArtiSynth is available from GitHub at the URL
https://github.com/artisynth/artisynth_core.git
After installation, users can continually update the ArtiSynth codebase to the latest version using pull operations (Section 12). In some cases, developers we work with closely can also obtain, by mutual arrangement, write access to our GitHub repository, allowing them to also commit changes.
Users who have a GitHub account combined with SSH keys may instead wish to clone using the SSH URL
git@github.com:artisynth/artisynth_core.gitFor users with repository write access, this will allow them to perform subsequent push operations without having to enter a username and password.
6.1 Installation using Eclipse
If you are planning to use the Eclipse IDE (Section 13), you can install from GitHub directly into Eclipse. Directions on installing Eclipse and configuring it for ArtiSynth development are given in Section 13.1. Once Eclipse is installed, ArtiSynth can be installed as follows:
-
1.
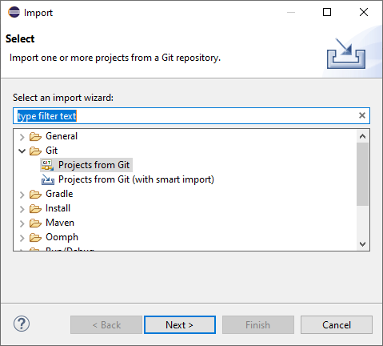
From the main menu, select “File > Import ...”. This will cause an Import dialog to appear, as shown below. Open “Git > Projects from Git”, and then click Next.
-
2.
In the next dialog, choose Clone URI, and click Next.
-
3.
A Source Git Repository dialog will appear, as shown below. In the URI field at the top, enter
https://github.com/artisynth/artisynth_core.git
This will automatically fill the Host and Repository path fields. Click Next.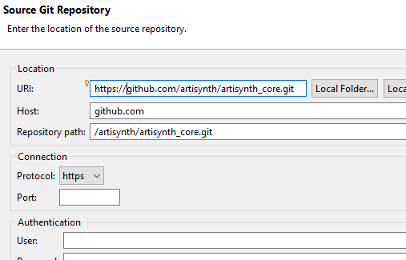
-
4.
A Branch Selection dialog will appear; uncheck svn, so that only master is selected. Click Next.
-
5.
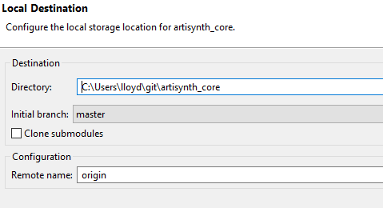
A Local Destination dialog will appear as shown below, indicating the folder into which ArtiSynth will be placed locally. Use the default location, or edit it to the desired location. This will be your ArtiSynth home folder, and will be referred to later in this document as <ARTISYNTH_HOME>. Click Next.
-
6.
ArtiSynth will now be downloaded; this may take a few minutes, depending on your network connection speed. Another dialog will appear, asking you to select to project import wizard. Leave the default (“Import existing Eclipse projects”) selected, and click Next.
-
7.
An Import Projects dialog will appear, confirming that you want to import artisynth_core. Leave everything as is, and click Finish.
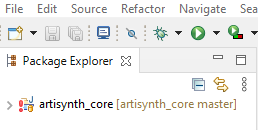
artisynth_core has now been imported into Eclipse as a project. However, we are not quite done. Eclipse will try to compile artisynth_core, but will fail because some Java and native libraries are missing. (These libraries are not included in the GitHub repository because they are quite large.) The compile failure will be indicated by a red exclamation mark to the left of the artisynth_core project entry in the Package Explorer:
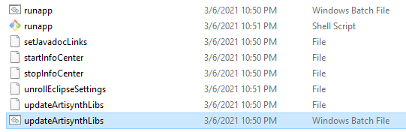
The Java and native libraries must be downloaded separately, outside of Eclipse. Open a file explorer, navigate to the <ARTISYNTH_HOME> folder (described above), open the bin folder, and click on the updateArtisynthLibs batch file (Figure 1). This will load the libraries, temporarily displaying a terminal window while doing so. The process may take a few minutes, depending on network speed.
When the libraries are loaded, return to Eclipse, click on the artisynth_core project to select it, then “refresh”, either by right clicking and selecting Refresh, or by hitting the F5 key. Eclipse should now find the libraries and compile ArtiSynth; a green progress bar will appear at the lower right while compilation is in progress.
Regardless of the JDK version, ArtiSynth is compiled to be compliant with Java 8, to ensure compatibility with MATLAB. The Eclipse settings supplied in artisynth_core\.settings will ensure Java 8 compliance.
After compilation is complete, ArtiSynth can be run by simply choosing Run > Run from the main menu. This works by invoking a predefined launch configuration named ArtiSynth. In some cases, one may wish to adjust this launch configuration to set environment variables, command line arguments, or Java JVM arguments that affect how ArtiSynth behaves. Instructions for doing so are contained in Sections 13.3 and 13.4.
6.2 Installation using Git for Windows
Git for Windows is an application that provides the user with a terminal window interface that can be used for entering Git commands. Users can choose between GitBash, which provides a Unix-like bash shell, or GitCMD, which provides a Windows CMD shell. GitBash has several advantages, such as allowing users to easily set environment variables in a .bashrc file (Section 14.2.3), and supplying a number of Unix-like commands that can be convenient for tasks other than those involving Git.
At the time of this writing, Git for Windows can be installed from git-scm.com/download/win.
Once installed, ArtiSynth can then be installed and compiled by opening a GitBash window and entering the following commands (where the ‘$’ character indicates the GitBash prompt and should not be entered):
The first line simply sets the current folder to the one under which you wish to install ArtiSynth, as indicated by /path/to/install. (Note that GitBash follows the Unix convention of using forward slash (’/’) instead of backslash (’\’) to separate files.) The git clone command then downloads ArtiSynth and extracts it to a folder named artisynth_core, so that the ArtiSynth installation directory (or <ARTISYNTH_HOME>) is/path/to/install/artisynth_core. The updateArtisynthLibs command fetches additional libraries that are not included in the GitHub repository for space reasons, and the bin/compile command on the last line is an ArtiSynth-supplied utility that compiles all .java files located under the current folder.
If you have GNU make installed on your system, then you can use that instead of the compile command, replacing
with
Regardless of the JDK version, ArtiSynth is compiled to be compliant with Java 8, to ensure compatibility with MATLAB. The make or compile commands described above are configured to ensure Java 8 compliance.
The compile (or make) command automatically determines the Java classpath needed to compile ArtiSynth. However, if you have explicitly set the CLASSPATH environment variable, then that will be used to define the classpath instead, in which case it must contain both the ArtiSynth classes folder and .jar files in the lib folder. See Sections 10.1.2 and 14.2.
Once built, ArtiSynth can then be run (from within artisynth_core) using the command
For convenience, if you place <ARTISYNTH_HOME>\bin in your Path environment variable (Section 14.1), then ArtiSynth can be run independently of the current directory using the simple command
% artisynth
ArtiSynth can also be installed and compiled using GitCMD, with an analogous command sequence:
The only real difference is using backslash (’\’) instead of forward slash (’/’) as a file separator.
Details on how to load and run demo models are given in Section 7.
Note that once you have installed ArtiSynth, you still have the option to later import it into an IDE such as Eclipse. For Eclipse specifically, this is done by importing it as an external project, as described in Section 13.2.
![[LOGO]](data:image/png;base64,iVBORw0KGgoAAAANSUhEUgAAAAsAAAAOCAYAAAD5YeaVAAAAAXNSR0IArs4c6QAAAAZiS0dEAP8A/wD/oL2nkwAAAAlwSFlzAAALEwAACxMBAJqcGAAAAAd0SU1FB9wKExQZLWTEaOUAAAAddEVYdENvbW1lbnQAQ3JlYXRlZCB3aXRoIFRoZSBHSU1Q72QlbgAAAdpJREFUKM9tkL+L2nAARz9fPZNCKFapUn8kyI0e4iRHSR1Kb8ng0lJw6FYHFwv2LwhOpcWxTjeUunYqOmqd6hEoRDhtDWdA8ApRYsSUCDHNt5ul13vz4w0vWCgUnnEc975arX6ORqN3VqtVZbfbTQC4uEHANM3jSqXymFI6yWazP2KxWAXAL9zCUa1Wy2tXVxheKA9YNoR8Pt+aTqe4FVVVvz05O6MBhqUIBGk8Hn8HAOVy+T+XLJfLS4ZhTiRJgqIoVBRFIoric47jPnmeB1mW/9rr9ZpSSn3Lsmir1fJZlqWlUonKsvwWwD8ymc/nXwVBeLjf7xEKhdBut9Hr9WgmkyGEkJwsy5eHG5vN5g0AKIoCAEgkEkin0wQAfN9/cXPdheu6P33fBwB4ngcAcByHJpPJl+fn54mD3Gg0NrquXxeLRQAAwzAYj8cwTZPwPH9/sVg8PXweDAauqqr2cDjEer1GJBLBZDJBs9mE4zjwfZ85lAGg2+06hmGgXq+j3+/DsixYlgVN03a9Xu8jgCNCyIegIAgx13Vfd7vdu+FweG8YRkjXdWy329+dTgeSJD3ieZ7RNO0VAXAPwDEAO5VKndi2fWrb9jWl9Esul6PZbDY9Go1OZ7PZ9z/lyuD3OozU2wAAAABJRU5ErkJggg==)