13 Customizing the Model and Script Menus
The model and script menus are useful interfaces for loading ArtiSynth models and running Jython scripts. The upper sections of these contain menu arrangements which allow models to be loaded or scripts to be run by simply clicking on a menu item. These menu arrangements may be customized by the user.
The upper model menu comes initialized with predefined entries that locate all models defined in the packages artisynth.demos and artisynth.models. Customization may be desirable in order to:
-
•
Access models declared in packages outside artisynth.demos and artisynth.models;
-
•
Reduce the scope of the menu to a smaller set of models or model packages.
Meanwhile, the upper script menu comes initialized to find only scripts located in src/artisynth/demos/scripts relative to the ArtiSynth installation folder, so customization will be necessary to access scripts outside of this.
Either menu may be customized by selecting “Edit menu ...” at the menu’s bottom, which will open one of the menu editors described below.
13.1 Model menu editor
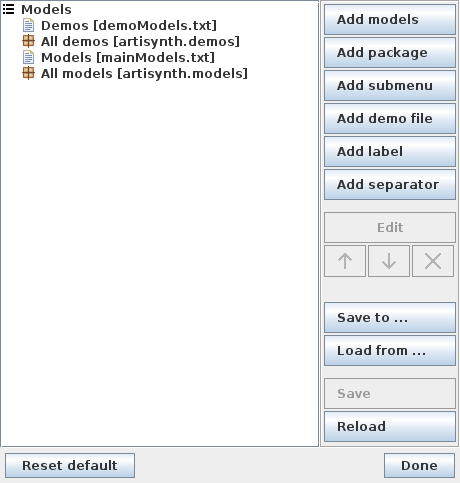
The upper part of the model menu may be customized using the model menu editor (Figure 58), which may be opened by selecting “Edit menu ...” at the bottom of the model menu. The editor comprises a large menu panel on the left side, containing a tree representation of the menu, and an edit panel on the right side which supports various editing actions.
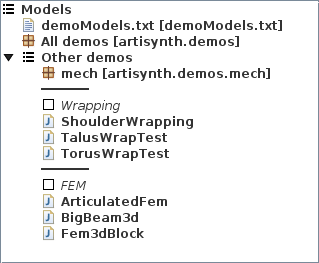
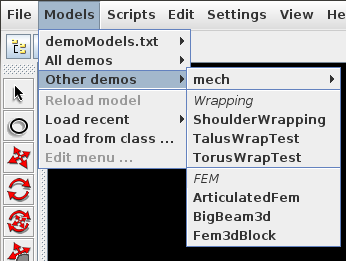
A model menu is composed of a hierarchical arrangement of six types of menu entries, summarized in Table 1 and described in more detail in Section 13.3. Every entry has a title attribute denoting the text used in the actual menu. The set of menu entries is displayed hierarchically in the editor’s menu panel, with each entry indicated by an icon (see Table 1) followed by its title. Entries can be selected by clicking on them using the left mouse button, using the CTRL and SHIFT modifier keys to enable multiple and contiguous selection. Figure 59 shows an example menu panel display on the left with the corresponding model menu on the right.
| Package | Submenu containing all models within a specific Java package and subpackages. | |
| Model | Menu entry for an individual model. | |
| Submenu | General submenu containing other menu entries. | |
| Demo file | Submenu consisting of all models listed in a text file. | |
| Label | Menu entry consisting of a descriptive label. | |
| Separator | Menu entry consisting of a separating line. |
 |
 |
Editing actions that may be initiated include:
- Adding menu entries
-
The Add buttons in the edit panel allow the different menu entries to be added to the the menu. Add operations for all entry types except separators invoke a dialog for configuring the new entry; details on these are given in Section 13.3. If no entries are selected when the add operation is initiated, the new entry will be placed at the end of the top-level menu. Otherwise, if a submenu entry is selected, the new entry will be placed at the end of that submenu. Finally, if a non-submenu entry is selected, the new entry will be inserted in the location of the selected entry.
- Editing menu entries
-
All menu entries except separators have attributes that can be edited by selecting the entry and clicking the Edit button in the editing panel. Details on these attributes are given in Section 13.3.
- Rearranging and deleting menu entries
-
Menu entries can be rearranged or deleted using the up/down arrow and X buttons:
Rearrangement can be done within a submenu by selecting a contiguous set of entries within that submenu and using the up/down arrows to move them up or down with respect to other submenu entries. Entries can be deleted by selecting any number of them, within any submenu, and clicking the X button.
- Saving and loading from files
-
The Save and Reload buttons at the bottom of the edit panel can be used to save/reload the current menu to/from the initialization file settings/modelMenu.xml, located in the user configuration folder (Section 1.1). The buttons ”Save to ...” and “Load from ...” can be used to save/load the menu from alternative files. The “Reset to default” button in the lower left corner of the dialog resets the menu and its configuration files to their original settings.
Changes that are made in the menu editor appear immediately in the model menu itself. Changes which involve adding, deleting or rearranging entries can be undone using the Undo option in ArtiSynth’s main Edit menu (Section 16.1.3).
Submenus which are empty are displayed in the menu editor but not in the menu itself. Submenus may be empty if no entries have been added to them, or if the model entries specified within them are not actually found. The latter most commonly occurs when the packages containing said models are not visible to ArtiSynth.
13.2 Script menu editor

The upper part of the script menu may be customized using the script menu editor (Figure 60), which may be opened by selecting “Edit menu ...” at the bottom of the script menu. Its structure and function is essentially identical to the model menu editor (Section 13.1), except that the Package, Model, and Demo file entries are replaced by the Script folder and Script entries, as shown in in Table 2 and described in more detail in Section 13.3. The initialization file accessed by the Save and Reload buttons is settings/scriptMenu.xml, located in the user configuration folder (Section 1.1).
| Script folder | Submenu containing all scripts within a specific folder. | |
| Script | Menu entry for an individual script. | |
| Submenu | General submenu containing other menu entries. | |
| Label | Menu entry consisting of a descriptive label. | |
| Separator | Menu entry consisting of a separating line. |
13.3 Menu entry types
13.3.1 Model
For model menus, a model entry is used to select a specific model; clicking on this entry type in the model menu causes the class defining the model to be loaded. Model classes must be public subclasses of RootModel.
To add a model entry to the menu, click Add model in the edit panel. This opens an add model dialog,
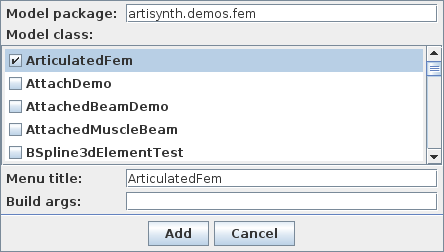
which allows the user to specify the model class and (optional) build() method arguments using the “Model package”, “Model class” and “Build args” fields in the same manner discussed in Section 2.2. Multiple models may be selected in the “Model class” panel; if this is done, a separate model entry will be created for each. The menu title can be set explicitly using the “Menu title” field; otherwise, the title will default to the model class’s simple name.
Once created, a model entry can be edited by selecting it in the editor’s menu panel and clicking the Edit button, which opens an editing dialog that also allows the user to adjust the title font properties.
13.3.2 Package
For model menus, a package entry is a submenu containing all the model classes found within a specified Java package and its subpackages. The submenu contents may be arranged either as a flat list, or hierarchically based on the subpackages (the default). Again, each model class must be an public subclasses of RootModel. Individual model classes can be excluded from package menu entries by defining the public boolean member variable omitFromMenu and setting it to true:
public class MyModel extends RootModel {
   ...
   public static boolean omitFromMenu = true;
   ...
}
To add a package entry to the menu, click “Add package” in the edit panel. This opens an add package dialog,
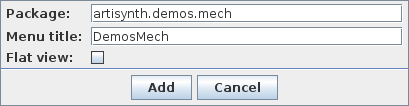
which allows the user to specify the package, menu title, and whether to use a flat or hierarchical view. Auto-completion is supported by the Package field, with the <TAB> character invoking auto-completion based on currently known packages and repeated use of either <TAB> or the up/down arrows will scroll through known packages. Package entry is completed using the <ENTER> key.
If the title is omitted (via an empty “Menu title” field), then the menu entries are not presented as a submenu, but instead are unrolled directly into the submenu containing the package entry.
Once created, a package entry can be edited by selecting it in the editor’s menu panel and clicking the Edit button. This opens an editing dialog that allows the user to adjust additional attributes, such as the title font properties, the maximum number of rows, and whether to employ scrolling, as described in more detail in Section 13.3.6.
13.3.3 Demo file
For model menus, a “demo file” entry is a submenu containing all the models listed in a plain text file, using the format described in Section 13.5. Plain text files have the advantage of being more human-readable, and are easier to edit and comment out line.
To add a demo file entry to the menu, click “Add demo file” in the edit panel. This opens an add demo file dialog,

which allows the user to specify the file name and the menu title. If the title is omitted (via an empty “Menu title” field), then the menu entries are not presented as a submenu, but instead are unrolled directly into the submenu containing the entry.
Once created, a demo file entry can be edited by selecting it in the editor’s menu panel and clicking the Edit button. This opens an editing dialog that allows the user to adjust additional attributes, such as the title font properties, the maximum number of rows, and whether to employ scrolling, as described in more detail in Section 13.3.6.
13.3.4 Script
For script menus, a script entry is used to select a specific script file; clicking on this entry type in the script menu causes this script file to be run.
To add one or more script entries to the menu, click “Add scripts” in the edit panel. This opens an add script dialog,
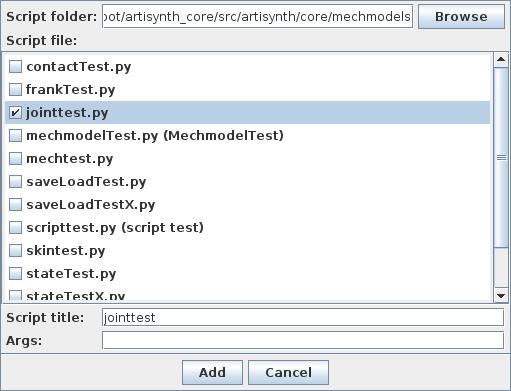
which allows the user to specify the script and (optional) arguments using the “Script folder”, “Script file”, and “Args” fields in the same manner discussed in Section 12.5. Multiple scripts may be selected in the “Script file” panel; if this is done, a separate entry will be created for each. The menu title can be set explicitly using the “Menu title” field; otherwise, the title will default to the script’s file name.
Once created, a script entry can be edited by selecting it in the editor’s menu panel and clicking the Edit button, which opens an editing dialog that also allows the user to adjust the title font properties.
13.3.5 Script folder
For script menus, a script folder entry is a submenu containing all the scripts found within a specified folder. The scripts are found by searching the folder for all files that end in .py and .jy, and which also contain the special first line
where scriptTitle is the desired menu title for the script.
To add a script folder entry to the menu, click “Add script folder” in the edit panel. This opens an add script folder dialog,

which allows the user to specify the script folder and menu title via the “Script folder” and “Menu title” fields. If not explicitly specified, the title defaults to the name of the folder. If the title is omitted, by explicitly setting it to an empty string, then the menu entries are not presented as a submenu, but instead are unrolled directly into the submenu containing the script folder entry.
Once created, a script folder entry can be edited by selecting it in the editor’s menu panel and clicking the Edit button. This opens an editing dialog that allows the user to adjust additional attributes, such as the title font properties, the maximum number of rows, and whether to employ scrolling, as described in more detail in Section 13.3.6.
13.3.6 Submenu
A submenu entry is a generalized submenu that can contain an arbitrary list of other menu entries, and is used to create hierarchical menus.
To add a submenu entry to the menu, click “Add submenu” in the edit panel. This opens an add submenu dialog,

which allows the user to specify the submenu’s title. Once the submenu is created, new menu entries can be added to it by selecting the submenu in the editor’s menu panel and then clicking the appropriate Add buttons; the new entries will be placed at the end of the submenu. Alternatively, if the user selects a non-submenu entry within the submenu, and then clicks one of the Add buttons, the new entry will be placed in the location indicated by the selection.
Once created, a submenu entry can be edited by selecting it and clicking the Edit button, which opens an editing dialog that allows the user to adjust additional attributes, including whether to support scrolling, the maximum numbers of rows in the menu, and the title font properties:
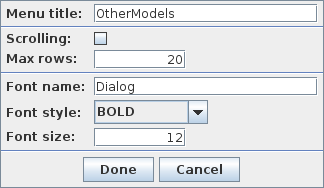
Scrolling can be useful for submenus with many entries: when the number of rows exceeds the specified maximum, then the menu is presented within a scrolling pane. Otherwise, if scrolling is not enabled, extra entries are accommodated by adding additional columns to the menu (Figure 61).
 |
 |
13.3.7 Label
A label entry is an inactive text element that cannot be selected in the menu. It can be used to label a group of entries. To help distinguish a label from an active menu item, the default font style is set to "italic".
To add a label entry to the menu, click “Add label” in the edit panel. This opens an add label dialog,

in which the user enters the label title. After it has been created, the label can be edited by selecting it in the editor’s menu panel and clicking Edit, which opens an editing dialog that allows the user to also adjust the title font properties.
13.3.8 Separator
A separator entry is a horizontal line that visually separates menu entries. It can help distinguish groups of related menu items.
To add a separator entry to the menu, click “Add separator” in the edit panel. This will simply add a separator at the location indicated by the current selection; no dialog is needed.
13.4 Command line options
It is also possible to explicitly set the model menu using ArtiSynth command line arguments:
- -modelMenu <xmlFileName>
-
- -demoFile <fileName>
-
Specifies a basic menu from a simple list of models provided by <fileName>, using the format described in Section 13.5. When this option is used, the model menu editor is not available and the resulting menu cannot be edited.
13.5 Demo file text format
A plain text file format is used to supply a list of model menu items, for either demo file menu entries (Section 13.3.3), or use with the -demoFile command line option (Section 13.4). In this format, entries are listed as title-class pairs, separated by whitespace. Lines beginning with a hash (#) are ignored. Titles containing spaces must be surrounded by quotation marks. The following is an example:
13.6 XML Menu Format
Model and script menus are stored using a custom XML file format, which is documented here in case users which to create their own files from scratch. The default files specifying the model and script menus are modelMenu.xml and scriptMenu.xml, located in the settings subfolder of the configuration folder (Section 1.1).
XML schemas are provided that describe and enforce the required document structure. The schemas for the model and script menus are located, respectively, in
src/artisynth/core/modelmenu/modelmenu.xsd
src/artisynth/core/modelmenu/scriptmenu.xsd
relative to the ArtiSynth installation folder. The following XML elements are defined:
| For model menu files: | |
|---|---|
| ModelMenu: | the root element of the document |
| model: | specifies a specific model |
| package: | finds and lists all models in a specific Java package |
| demoFile: | specifies a submenu of models listed in a text file |
| For script menu files: | |
| ScriptMenu: | the root element of the document |
| script: | specifies a specific script file |
| scriptFolder: | finds and lists all scripts in a specific folder |
| For either file: | |
| menu: | creates a submenu |
| label: | inserts an inactive text entry |
| separator: | inserts a horizontal line that separates entries |
| hidden: | convenience element for hiding menu entries (i.e. commenting them out) |
Detailed descriptions of these element types and their supported attributes are provided in the following sections. Attributes of the model, package, demoFile, script, scriptMenu, submenu, demoFile, label, and separator types correspond to attributes of the menu entry types described in Section 13.3. Attributes marked by an asterisk are required in the element definition.
13.6.1 The root elements
The root elements ModelMenu and ScriptMenu encapsulate the entire description for either a model or script menu. They must make reference to the schema for validation purposes. The following code snippet can be used as a template for creating a model menu file,
while the next snippet can be used for script menus:
13.6.2 Model element
Describes a model menu entry (Section 13.3.1), with the class attribute specifying the model class, which must be a public subclass of RootModel.
Attributes:
class*:
class to load when the entry is selected
buildArgs:
command-line style arguments to be passed to the model’s build() method
title:
title text for menu entry (default: the class name)
fontname:
font family for the title text
fontstyle:
font style, from {"", "bold", "italic",
"bold italic"}
fontsize:
font size
The following snippet creates a menu entry titled "Muscle Arm", which will launch the model FemMuscleArm.
13.6.3 Package element
Describes a package entry (Section 13.3.2), with the name attribute specifying the Java package containing the model classes.
Attributes:
name*:
Name of the Java package in which to search for models
title:
title text for menu entry; if omitted, entries are unrolled into parent menu
view:
display format {"flat", "hierarchicial"} (default:
"hierarchical")
scrolling:
enables a scrolling menu (default: false)
maxRows:
maximum number of rows in the submenu (default: 20)
compact:
level of compactness {0, 1, 2} (default: 0)
0:
A new submenu is created for each subpackage (hierarchical),
displayed text refers to full package.class name relative
to source (flat)
1:
subpackages containing a single entity are merged into the
parent menu (hierarchical), displayed text refers to unique
part of the package.class name only (flat)
2:
subpackages containing a single entity are merged into the
parent menu (hierarchical) and displayed text refers to the
class name only (hierarchical/flat)
fontname:
font family for the title text
fontstyle:
font style, from {"", "bold", "italic",
"bold italic"}
fontsize::
font size
If the title attribute is omitted, then the submenu contents are unrolled directly into the parent menu.
If font information is provided, it is applied to all entries. The following snippet creates a submenu containing every instance of RootModel found in the package artisynth.demos.mech, with a small font specified for all entries to get the menu to fit easily on the screen:
13.6.4 DemoFile element
Describes a demo file entry (Section 13.3.3), with the file attribute specifying the path to the file listing the models. If this path is relative and not absolute, the parser tries to locate the file with respect to (in order) (a) the folder containing the XML file being read, (b) the user’s home folder and (c) the ArtiSynth installation folder.
Attributes:
file*:
file listing the model entries
title:
title text for menu entry; if omitted, entries are unrolled into parent menu
scrolling:
enables a scrolling menu (default: false)
maxRows:
maximum number of rows in the submenu (default: 20)
fontname:
font family for the title text
fontstyle:
font style, from {"", "bold", "italic",
"bold italic"}
fontsize:
font size
If the title attribute is omitted, then the submenu contents are unrolled directly into the parent menu. If font information is provided, it is applied to all model entries that are created.
The following snippet loads all models from the original default ArtiSynth Models menu.
13.6.5 Script element
Describes a script menu entry (Section 13.3.4), with the file attribute specifying the path to the script file. If this path is relative and not absolute, the parser tries to locate the file with respect to (in order) (a) the user’s home folder and (b) the ArtiSynth installation folder.
Attributes:
file*:
file path for the script
args:
command-line style arguments to be passed to the script
title:
title text for menu entry (default: the base file name)
fontname:
font family for the title text
fontstyle:
font style, from {"", "bold", "italic",
"bold italic"}
fontsize:
font size
The following snippet creates a script entry titled "run models", which will run the script /home/lloyd/modelrunner.py:
13.6.6 ScriptFolder element
Describes a submenu entry containing all scripts located automatically within a specific folder, as detailed in Section 13.3.5, with the file attribute specifying the path to the folder. If this path is relative and not absolute, the parser tries to locate the folder with respect to (in order) (a) the user’s home folder and (b) the ArtiSynth installation folder.
Attributes:
file*:
path name of the folder containing the scripts
title:
title text for menu entry; if omitted, entries are unrolled into parent menu
scrolling:
enables a scrolling menu (default: false)
maxRows:
maximum number of rows in the submenu (default: 20)
fontname:
font family for the title text
fontstyle:
font style, from {"", "bold", "italic",
"bold italic"}
fontsize::
font size
If the title attribute is omitted, then the submenu contents are unrolled directly into the parent menu. If font information is provided, it is applied to all entries.
The following snippet creates a script folder entry titled "Demo scripts", based on all the script files in the folder src/artisynth/demos/scripts:
13.6.7 Submenu element
Describes a submenu menu entry (Section 13.3.6).
Attributes:
title*:
title text for menu entry
scrolling:
enables a scrolling menu (default: false)
maxRows:
maximum number of rows in the submenu (default: 20)
fontname:
font family for the title text
fontstyle:
font style, from {"", "bold", "italic",
"bold italic"}
fontsize:
font size
The following code snippet creates a submenu "FEM Models", which in turn lists three specific FEM models:
13.6.8 Label element
Describes a label entry (Section 13.3.7).
Attributes:
title*:
title text for the label
fontname:
font family for the title text
fontstyle:
font style, from {"", "bold", "italic",
"bold italic"}
fontsize:
font size
In the following code snippet, a label is added before the tongue tracking models.
13.6.9 Separator element
Describes a separator entry (Section 13.3.8). The separator element has no attributes.
The following snippet adds a separator line between models found in the artisynth.models.femdemos package and those in artisynth.models.inversedemos.
13.6.10 Hiding elements
It is often convenient to have the ability to "comment-out" lines in any kind of coding system: the data remains in the file, but has no effect when processed. The typical method for commenting in XML is to use the <!-- --> tags. Unfortunately, this can be messy, and comments cannot contain other comments. For this reason, a special hidden element was created. Any entries within a hidden element are ignored by the parser.
![[LOGO]](data:image/png;base64,iVBORw0KGgoAAAANSUhEUgAAAAsAAAAOCAYAAAD5YeaVAAAAAXNSR0IArs4c6QAAAAZiS0dEAP8A/wD/oL2nkwAAAAlwSFlzAAALEwAACxMBAJqcGAAAAAd0SU1FB9wKExQZLWTEaOUAAAAddEVYdENvbW1lbnQAQ3JlYXRlZCB3aXRoIFRoZSBHSU1Q72QlbgAAAdpJREFUKM9tkL+L2nAARz9fPZNCKFapUn8kyI0e4iRHSR1Kb8ng0lJw6FYHFwv2LwhOpcWxTjeUunYqOmqd6hEoRDhtDWdA8ApRYsSUCDHNt5ul13vz4w0vWCgUnnEc975arX6ORqN3VqtVZbfbTQC4uEHANM3jSqXymFI6yWazP2KxWAXAL9zCUa1Wy2tXVxheKA9YNoR8Pt+aTqe4FVVVvz05O6MBhqUIBGk8Hn8HAOVy+T+XLJfLS4ZhTiRJgqIoVBRFIoric47jPnmeB1mW/9rr9ZpSSn3Lsmir1fJZlqWlUonKsvwWwD8ymc/nXwVBeLjf7xEKhdBut9Hr9WgmkyGEkJwsy5eHG5vN5g0AKIoCAEgkEkin0wQAfN9/cXPdheu6P33fBwB4ngcAcByHJpPJl+fn54mD3Gg0NrquXxeLRQAAwzAYj8cwTZPwPH9/sVg8PXweDAauqqr2cDjEer1GJBLBZDJBs9mE4zjwfZ85lAGg2+06hmGgXq+j3+/DsixYlgVN03a9Xu8jgCNCyIegIAgx13Vfd7vdu+FweG8YRkjXdWy329+dTgeSJD3ieZ7RNO0VAXAPwDEAO5VKndi2fWrb9jWl9Esul6PZbDY9Go1OZ7PZ9z/lyuD3OozU2wAAAABJRU5ErkJggg==)