2 Loading, Simulating and Saving Models
The first thing an ArtiSynth user is likely to want is to load a demonstration model, and explore and simulate it.
An ArtiSynth model is defined by a Java class which is a subclass of the ArtiSynth RootModel component. This class builds the model, serves as the root container for all its components, and implements the advance() method which allows the model to be simulated.
A number of predefined demonstration models come bundled with the ArtiSynth distribution and are declared within subpackages of artisynth.demos. These are generally simple models that illustrate particular simulation capabilities. More complex anatomical models, including those used in various research projects and mostly focused on head and neck anatomy, are available in the separate project artisynth_models, which must be downloaded separately (see www.artisynth.org/models for instructions). These anatomical models are declared within subpackages of artisynth.models.
To run user-defined models defined within Java packages that are outside of the project artisynth_core, it is necessary to arrange for their classpaths to be visible to the ArtiSynth application. One way to do this is to add the classpaths to the ArtiSynth external classpath, as described in Section 2.9. If one is using an integrated development environment (IDE) for Java compilation and execution, this linking can also be done within the IDE. More detailed information on this topic is given in the section “Making external models visible to ArtiSynth” of the ArtiSynth Installation Guide.
2.1 Loading from the model menu
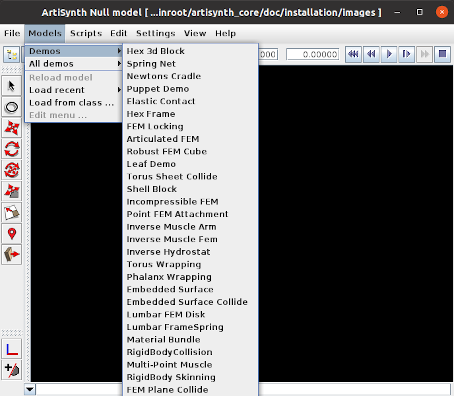
Some models can be loaded directly using the Models menu located in the ArtiSynth menu bar (Figure 1). By default, the upper part of this menu contains a number of submenus:
| Demos | - all models listed in the file demoModels.txt (described below); |
|---|---|
| All Demos | - every model found in artisynth.demos or its subpackages, arranged hierarchically. |
In addition, if artisynth_models has also been installed, or if ArtiSynth otherwise detects the presence of the superpackage artisynth.models, then the Models menu will also contain:
| Models | - all models listed in the file mainModels.txt (described below); |
|---|---|
| All Models | - every model found in artisynth.models or its subpackages, arranged hierarchically. |
Each submenu expands out to identify a set of models. Selecting one of the models will cause it to be loaded into ArtiSynth and displayed in the viewer. Hovering over one of the entries will display the full classname of the associated RootModel. The files demoModels.txt and mainModels.txt are located in the settings subfolder of the user configuration folder (Section 1.1); default instances of these are created the first time ArtiSynth is run, and they can later be modified by the user.
The lower part of the model menu, beneath the separator, contains entries for reloading recent models (Section 2.4), loading a model from an explicitly specified class (Section 2.2), and customizing the upper part of the the model menu (Section 13).
Model menu customization is is needed to create menu entries for root models not defined within (or beneath) the packages artisynth.demos or artisynth.models.
2.2 Loading directly by class
As mentioned above, models are defined by subclasses of RootModel. A model may therefore be loaded into ArtiSynth by directly specifying the class that defines its RootModel. To do this, choose “Load from class ...” from the lower part of the model menu, which will bring up a model selection dialog as shown in Figure 2.
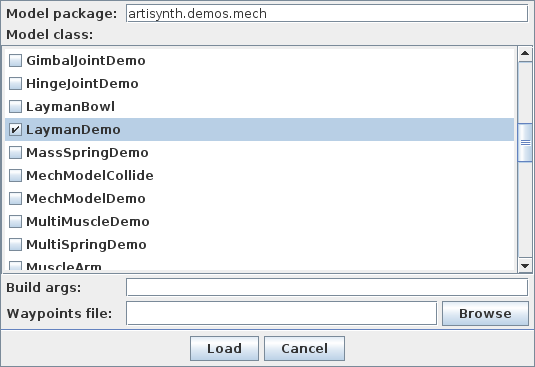
Users should specify the name of the package containing the model in the “Model package” field at the top. Using the <TAB> character in this field will invoke auto-completion based on currently know packages, while repeated use of either <TAB> or the up/down arrows will scroll through known packages. Package entry is completed using the <ENTER> key, and any models that appear in that package (but not its subpackages) will then be displayed in the “Model class” panel below it. The user can then select the desired model by clicking on it. In Figure 2, the model defined by the class artisynth.demos.mech.LaymanDemo has been selected.
If the model requires command-line style arguments to its build() method (as described in the section “Implementing the build() method” of the ArtiSynth Modeling Guide), these can be entered in the “Build args” field near the dialog bottom. Arguments should be separated by white space, with those containing white space placed between double quotes ‘"’. The last field, “Waypoints file”, can optionally be used to specify a file containing simulation way points (Section 7.3.1). As with all externally loaded waypoint data, the waypoints must match the current model structure.
When all desired settings have been made, the model can be loaded by clicking the Load button.
2.3 Loading from a file
Finally, it is possible to load a model from a file. Selecting “Load model ...” from the File menu will bring up a File browser that lets you select and load a model from an ArtiSynth model file. ArtiSynth model files are text-based documents that contain a hierarchical description of all the model’s components, and are typically identified by the extension .art.
When loading a model from a .art file, it is necessary to have all classes associated with that model in the current Java classpath. This can be an issue when loading files generated by other users using application-specific Java code. Two possible solutions to this are: (a) bundling the application-specific code into a .jar file and adding it to the external classpath (Section 2.9), or (b) making sure that the file was saved using only artisynth_core components, as described in Section 2.8.
2.4 Loading recent models
After a model has been loaded by any of the methods described above, it can be reloaded by selecting “Reload model” from the lower part of the model menu. Models which have been recently loaded can be reloaded by selecting “Load recent” from the Models menu.
2.5 Setting a startup model
When working repeatedly with a specific model, it can be useful to set that model to automatically load when ArtiSynth starts up. This can be done by setting the startup model, by choosing “Startup model ...” from the Settings menu. This will open a startup model dialog as shown in Figure 3.
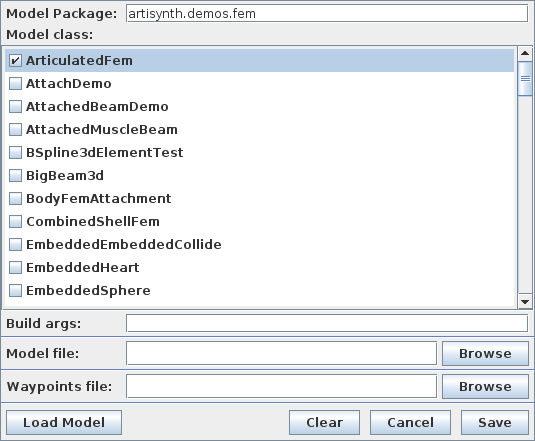
The model to load can be specified either by class or by file. To specify the model by class, one uses the “Model package”, “Model class” and “Build args” fields to choose the model class and optional build() method arguments in the same manner as described in Section 2.2. To specify the model by file, one instead uses the “Model file” field to select a model file, as described in Section 2.3.
For either kind of model, it is also possible to use the “Waypoints file” field to specify a file of saved waypoints to be loaded along with the model. As with all externally loaded waypoint data, the waypoints must match the current model structure. Waypoints are described in Section 7.3.1.
-
•
To save the startup model, click the Save button at the bottom of the dialog.
-
•
To clear the startup model (so that no model is loaded), click the Clear button followed by the Save button.
-
•
To load a specified model immediately, click the Load Model button.
2.5.1 Specifying models from the command line
As an alternative to setting the startup model, one may instead use the -model <classOrFileName> command line option to specify a model to load when ArtiSynth starts up. This can be useful when running ArtiSynth from a script. The <classOrFileName> argument may be either a class name or a .art file name. If a class name is specified and build() method arguments are also required, these may be listed within square brackets ([ ]) separated by white space. For example, to load the model class projects.MyModel and pass it the build() arguments “-size 50”, one can invoke ArtiSynth from the command line using
> artisynth -model projects.MyModel [ -size 50 ]
Models specified from the command line override the specified startup model. To ensure that no model is loaded, one may specify
> artisynth -model none
2.6 Simulating a model
Once a model is loaded, simulation of the model can be started, paused, single-stepped, or reset using the play controls (Figure 4) located at the upper right of the ArtiSynth window frame. Play controls are discussed in more detail in Section 7.2.1.
2.7 Other toolbar controls
The ArtiSynth application contains a toolbar that runs along the top of the frame. The right side contains the play controls shown in Figure 4.
When a grid is enabled in the viewer (Section 3.7), a text box appears in the center of the toolbar displaying the current grid units (Section 3.7.1).
The left side of the toolbar contains the following buttons:
| NavPanel: | Shows or hides the navigation panel (Section 4.2) | |
| Reset state: | Resets the simulation state at time 0 to the current state. | |
| Rerender: | Rerenders all viewers and displays. | |
| Enable real-time: | If pressed (the default setting), forces simulations to run no faster than real time. |
If real-time is enabled (via the last button), the ArtiSynth scheduler will try to make the apparent simulation speed equal to real time. Simulations can of course run much slower than real time if they involve complex models with many degrees of freedom (such as large finite element models). However, for simpler models, real-time can also increase the overall simulation time, which is why the option to disable real-time is provided.
2.8 Saving a model
An ArtiSynth model can be saved to a file to be reloaded and used later. Selecting “Save model as ...” from the File menu will bring up a dialog that lets you select the name and directory for the model file (Figure 5). If a model file has already been specified, then one can save to it again by selecting the Save model menu item. ArtiSynth model files are text-based and are typically identified by the extension .art.
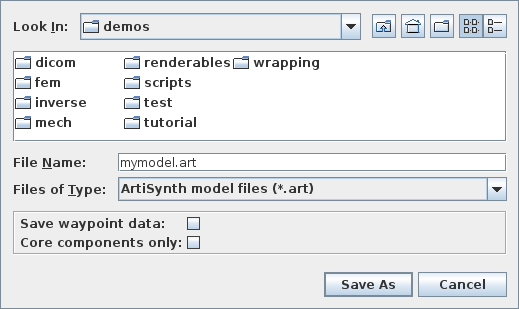
When using the “Save model as ...” menu item, the user may choose the following options:
- Save waypoint data:
-
Causes the state data for any valid waypoints (Section 7.3) to be saved (within the file) in addition to the waypoint locations. This is optional because a large number of waypoints may significantly increase the file size for models with a large state sizes.
- Core components only:
-
Saves only those components which are present in the main artisynth_core package. Any non-core components, and any other components which have a hard dependency on them, will not be written, and the user will be advised of this via a message dialog. The root model (Section 4.1) is saved as a pure instance of RootModel, instead of the application-specific class that was used to build it. This means that any properties or class overrides specific to the application root model class will not be present in the saved model. The advantage to storing a model using only core components is that it can be loaded by any other user running the same ArtiSynth version, without needing access to any application-specific classes.
2.9 Setting the external classpath
As mentioned above, the classpath(s) for models declared outside of artisynth_core must be made visible to ArtiSynth so that they can be found and loaded. Detailed information on this topic is given in the section “Making external models visible to ArtiSynth” of the ArtiSynth Installation Guide.
An easy way to make classpaths visible to ArtiSynth is to add them to the external classpath, which is a list of top-level class folders and/or .JAR files containing the classes required to run external models. These may include both model classes and any external Java libraries that they require.
The external classpath is contained in a file named EXTCLASSPATH in the user configuration folder (Section 1.1). This file can be edited directly from ArtiSynth by selecting “External classpath ...” from the Settings menu, which will open the editing dialog shown in Figure 6.
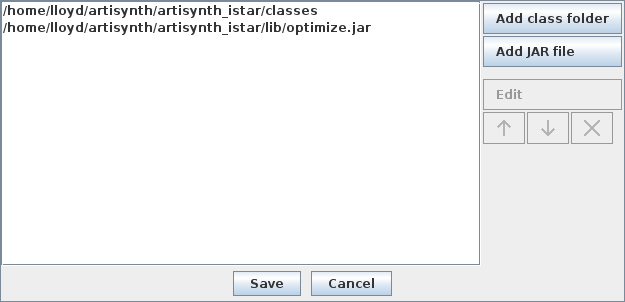
The current class folders and JAR files are listed, one per line, in the large panel at the left. If the external classpath is empty, this panel will be blank. New class folders or JAR files can be added using the “Add class folder” and “Add JAR file” buttons at the right, which invoke file choosers appropriate to the file type. Existing entries can be selected and then edited, moved up or down in the list (using the up/down arrow buttons), or deleted (using the X button). When editing is complete, the updated external classpath can be saved using the Save button at the bottom.
ArtiSynth must be restarted for external classpath changes to come into effect.
2.10 The ArtiSynth working folder
ArtiSynth maintains the notion of a working folder, which is the default folder (or directory, in Unix parlance) under which the files used to store various types of model information are stored. This includes model files, as described above, along with other files such as those used to store waypoints, probe configurations, or probe data (Section 8).
Chooser dialogs for these files will generally be initialized to the working folder if their files have not been previously set.
The working folder is initialized to the system working folder from which the ArtiSynth application is started. Once ArtiSynth is running, it can be set by choosing “Set working folder ...” from the File menu, or by calling
ArtisynthPath.setWorkingFolder (file)
in code. When a model is saved (Section 2.8), the working folder is saved with it and restored when the model file is subsequently loaded.
![[LOGO]](data:image/png;base64,iVBORw0KGgoAAAANSUhEUgAAAAsAAAAOCAYAAAD5YeaVAAAAAXNSR0IArs4c6QAAAAZiS0dEAP8A/wD/oL2nkwAAAAlwSFlzAAALEwAACxMBAJqcGAAAAAd0SU1FB9wKExQZLWTEaOUAAAAddEVYdENvbW1lbnQAQ3JlYXRlZCB3aXRoIFRoZSBHSU1Q72QlbgAAAdpJREFUKM9tkL+L2nAARz9fPZNCKFapUn8kyI0e4iRHSR1Kb8ng0lJw6FYHFwv2LwhOpcWxTjeUunYqOmqd6hEoRDhtDWdA8ApRYsSUCDHNt5ul13vz4w0vWCgUnnEc975arX6ORqN3VqtVZbfbTQC4uEHANM3jSqXymFI6yWazP2KxWAXAL9zCUa1Wy2tXVxheKA9YNoR8Pt+aTqe4FVVVvz05O6MBhqUIBGk8Hn8HAOVy+T+XLJfLS4ZhTiRJgqIoVBRFIoric47jPnmeB1mW/9rr9ZpSSn3Lsmir1fJZlqWlUonKsvwWwD8ymc/nXwVBeLjf7xEKhdBut9Hr9WgmkyGEkJwsy5eHG5vN5g0AKIoCAEgkEkin0wQAfN9/cXPdheu6P33fBwB4ngcAcByHJpPJl+fn54mD3Gg0NrquXxeLRQAAwzAYj8cwTZPwPH9/sVg8PXweDAauqqr2cDjEer1GJBLBZDJBs9mE4zjwfZ85lAGg2+06hmGgXq+j3+/DsixYlgVN03a9Xu8jgCNCyIegIAgx13Vfd7vdu+FweG8YRkjXdWy329+dTgeSJD3ieZ7RNO0VAXAPwDEAO5VKndi2fWrb9jWl9Esul6PZbDY9Go1OZ7PZ9z/lyuD3OozU2wAAAABJRU5ErkJggg==)