ArtiSynth Installation Guide for Linux
Last updated: July, 2024
Contents
- 1 Overview
- 2 Prerequisites
- 3 The ArtiSynth installation folder
- 4 Java JDK Requirements
- 5 Installing a Precompiled Release
- 6 Installing from GitHub
- 7 Loading and Running Models
- 8 Creating and Adding Models
- 9 Settings and the user configuration folder
- 10 Integrating external models
- 11 Installing artisynth_models
- 12 Updating ArtiSynth
- 13 The Eclipse IDE
- 14 Additional Information
1 Overview
ArtiSynth is an open-source Java-based platform that supports combined multibody/FEM modeling in an interactive simulation environment. Users may build their own models using Java code, or load preexisting models from either files or Java classes. This document describes how to install and run ArtiSynth on 64-bit Linux machines.
ArtiSynth’s prerequisites are listed in Section 2. A Java JDK must be installed on your system; information on this is given in Section 4.
There are two ways to obtain ArtiSynth:
-
1.
Install a precompiled release - the fastest way to quickly install ArtiSynth to try out some of the demo programs. Instructions for this are given in Section 5.
-
2.
Install from GitHub - recommended for more serious developers who want to keep their codebase current and easily install new features and bug fixes. When installing from GitHub, you also need to download the runtime libraries, and compile ArtiSynth. GitHub installation instructions are given in Section 6.
Once ArtiSynth is installed, it can be run and various demonstration models can be loaded. Some simple details on this are given in Section 7; complete instructions on running and interacting with models are provided in the ArtiSynth User Interface Guide.
Many users will want to create their own models in Java. This is done by creating Java classes to implement these models, as described in the ArtiSynth Modeling Guide, and then integrating them into ArtiSynth, as described in Section 8. When creating models, users may want to use an integrated development environment (IDE) for editing and compiling their Java code. At present, most of the ArtiSynth community uses the Eclipse IDE (Section 13), but other IDEs such as NetBeans and IntelliJ could be used as well.
Users may also want to install and run external models and projects that have been created either by others or by themselves. In particular, the project artisynth_models contains an open source set of models primarily related to head and neck anatomy. Installation of artisynth_models is discussed in Section 11.
It is also possible to interface ArtiSynth with, or run it under, MATLAB. For information on this, see the guide Interfacing ArtiSynth to MATLAB.
2 Prerequisites
To install ArtiSynth on Linux, you will need:
-
•
A 64 bit version of Linux running on either an Intel-based machine, or an ARM-based machine that implements an Intel compatibility layer.
-
•
A Java development kit (JDK) for 64 bit machines. If your machine is based on the ARM processor, you must still use an Intel-based JDK. See Section 4 for details.
You will need a Java development kit (JDK) that lets you actually compile Java code. A Java runtime environment (JRE) will not be sufficient.
If you are planning to use ArtiSynth with MATLAB, there are restrictions on which JDK you can use, as described in the guide Interfacing ArtiSynth to MATLAB.
-
•
Linux systems require GNU libc version 2.17 or higher.
-
•
A three-button mouse is useful for GUI interaction.
-
•
A machine with a good graphics card and a decent amount of memory. We recommend 16 Gbytes, or more if you are doing FEM analysis with larger numbers of elements.
3 The ArtiSynth installation folder
You can install ArtiSynth in any location you like. In this document, the location of the ArtiSynth installation directory will be denoted by <ARTISYNTH_HOME>. For example if ArtiSynth is installed in
/home/roger/artisynth_core
then <ARTISYNTH_HOME> denotes this directory and <ARTISYNTH_HOME>/lib denotes the sub-directory
/home/roger/artisynth_core/lib
4 Java JDK Requirements
ArtiSynth requires that you have a full 64-bit Java development kit (JDK) installed. A JDK comes with a Java compiler, whereas the simpler Java run time environment (JRE) does not.
Important: on ARM-based machines, you must still install a 64-bit Intel-based JDK which must then execute through an Intel compatibility layer. Invocation of the compatibility layer should generally be invisible to the user. 64-bit Intel-based JDKs contain the string x64 in their download names, whereas ARM-based JDKs contain aarch64 or arm32.
You will require JDK version 8 or higher. The most recent JDK with long term support is version 21. If you are planning to use ArtiSynth with MATLAB, there are restrictions on which JDK you can use, as described in the guide Interfacing ArtiSynth to MATLAB.
If you need a JDK, we recommend installing one from Oracle. At the time of this writing, the download page is at:
Download tabs for JDK 22, 21 and 17 are located near the top. Tabs for downloading JDK 8 and 11 are located further down the page. Downloads are available for all systems (Linux, macOS and Windows); be sure to choose the link appropriate to yours.
4.1 Ensuring the JDK is visible to your system
After the JDK has been installed, it is important to ensure that it is visible to your system and that it supersedes any other Java installations. One test for this is to open a terminal window and run the command
> javac -version
The output should match the version of the installed JDK. If it does not, or if the command javac is not found, then one fix is to add the directory <JDK_HOME>/bin to your system Path, as described in Section 14.1, where <JDK_HOME> is the JDK installation directory. When adding <JDK_HOME>/bin to your Path, it should be added ahead of any other Java installations that might be specified. To see the current contents of the Path, open a terminal window and run the command
> echo $PATH
5 Installing a Precompiled Release
Installing one of the precompiled releases is the easiest way to obtain ArtiSynth for running demo programs or some existing models. To do this, go to www.artisynth.org/downloads, download the distribution you want, and unzip it in an appropriate location on your computer.
5.1 Running from a terminal window
Once ArtiSynth is downloaded and unzipped, it can be run from a terminal window.
To do this, open a terminal window, set the current directory to <ARTISYNTH_HOME>, and run the command bin/artisynth:
 > cd <ARTISYNTH_HOME>
 > bin/artisynth
If you place <ARTISYNTH_HOME>/bin in your PATH environment variable (Section 14.1), then ArtiSynth can be run from a terminal window with the simple command
> artisynthregardless of the current directory.
Details on how to load and run demo models are given in Section 7.
A precompiled ArtiSynth distribution can also be imported into an integrated development environment (IDE), such as Eclipse, to facilitate compilation and execution. To import ArtiSynth into Eclipse, follow the instructions in Section 13.2, using <ARTISYNTH_HOME> as the project directory.
6 Installing from GitHub
For most users doing active modeling work, we recommend installing the current ArtiSynth development version from GitHub, which will provide ongoing access to updates and bug fixes. GitHub is a web-based repository service based on the source control management system Git. A very brief summary of Git is given in Section 14.5.
ArtiSynth is available from GitHub at the URL
https://github.com/artisynth/artisynth_core.git
After installation, users can continually update the ArtiSynth codebase to the latest version using pull operations (Section 12). In some cases, developers we work with closely can also obtain, by mutual arrangement, write access to our GitHub repository, allowing them to also commit changes.
Users who have a GitHub account combined with SSH keys may instead wish to clone using the SSH URL
git@github.com:artisynth/artisynth_core.gitFor users with repository write access, this will allow them to perform subsequent push operations without having to enter a username and password.
6.1 Installation using Eclipse
If you are planning to use the Eclipse IDE (Section 13), you can install from GitHub directly into Eclipse. Directions on installing Eclipse and configuring it for ArtiSynth development are given in Section 13.1. Once Eclipse is installed, ArtiSynth can be installed as follows:
-
1.
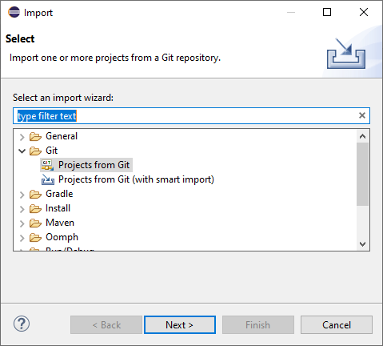
From the main menu, select “File > Import ...”. This will cause an Import dialog to appear, as shown below. Open “Git > Projects from Git”, and then click Next.
-
2.
In the next dialog, choose Clone URI, and click Next.
-
3.
A Source Git Repository dialog will appear, as shown below. In the URI field at the top, enter
https://github.com/artisynth/artisynth_core.git
This will automatically fill the Host and Repository path fields. Click Next.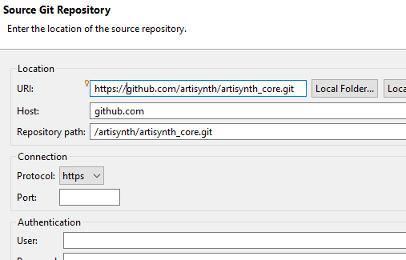
-
4.
A Branch Selection dialog will appear; uncheck svn, so that only master is selected. Click Next.
-
5.
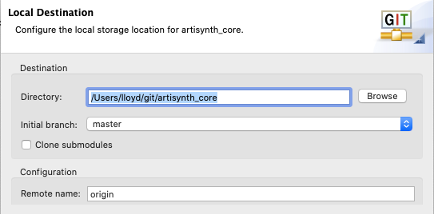
A Local Destination dialog will appear as shown below, indicating the directory into which ArtiSynth will be placed locally. Use the default location, or edit it to the desired location. This will be your ArtiSynth home directory, and will be referred to later in this document as <ARTISYNTH_HOME>. Click Next.
-
6.
ArtiSynth will now be downloaded; this may take a few minutes, depending on your network connection speed. Another dialog will appear, asking you to select to project import wizard. Leave the default (“Import existing Eclipse projects”) selected, and click Next.
-
7.
An Import Projects dialog will appear, confirming that you want to import artisynth_core. Leave everything as is, and click Finish.
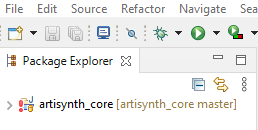
artisynth_core has now been imported into Eclipse as a project. However, we are not quite done. Eclipse will try to compile artisynth_core, but will fail because some Java and native libraries are missing. (These libraries are not included in the GitHub repository because they are quite large.) The compile failure will be indicated by a red exclamation mark to the left of the artisynth_core project entry in the Package Explorer:
The Java and native libraries must be downloaded separately, outside of Eclipse. Open a terminal window, change directories to <ARTISYNTH_HOME>, and run the command bin/updateArtisynthLibs:
 > cd /path/to/ARTISYNTH_HOME
 > bin/updateArtisynthLibs
The process may take a few minutes, depending on network speed.
When the libraries are loaded, return to Eclipse, click on the artisynth_core project to select it, then “refresh”, either by right clicking and selecting Refresh, or by hitting the F5 key. Eclipse should now find the libraries and compile ArtiSynth; a green progress bar will appear at the lower right while compilation is in progress.
Regardless of the JDK version, ArtiSynth is compiled to be compliant with Java 8, to ensure compatibility with MATLAB. The Eclipse settings supplied in artisynth_core/.settings will ensure Java 8 compliance.
After compilation is complete, ArtiSynth can be run by simply choosing Run > Run from the main menu. This works by invoking a predefined launch configuration named ArtiSynth. In some cases, one may wish to adjust this launch configuration to set environment variables, command line arguments, or Java JVM arguments that affect how ArtiSynth behaves. Instructions for doing so are contained in Sections 13.3 and 13.4.
6.2 Installation using the command line
If your Linux distribution has Git installed, then you can install ArtiSynth from a terminal window using the following commands:
The first line simply sets the current directory to the one under which you wish to install ArtiSynth, as indicated by /path/to/install. The git clone command then downloads ArtiSynth and extracts it to a folder named artisynth_core, so that the ArtiSynth installation directory (or <ARTISYNTH_HOME>) is /path/to/install/artisynth_core. The updateArtisynthLibs command fetches additional libraries that are not included in the GitHub repository for space reasons.
The make command and the associated Makefile automatically determine the Java classpath needed to compile ArtiSynth. However, if you have explicitly set the CLASSPATH environment variable, then that will be used to define the classpath instead, in which case it must contain the classes folder (located under the artisynth_core directory), as well as the .jar files in the lib directory. See Sections 10.1.2 and 14.2.
As an alternative to make, one can also compile ArtiSynth using the compile command:
compile is an ArtiSynth command line utility that compiles all .java files located under the current directory.
Regardless of the JDK version, ArtiSynth is compiled to be compliant with Java 8, to ensure compatibility with MATLAB. The make or compile commands described above are configured to ensure Java 8 compliance.
Once compiled, ArtiSynth can be run from the command line as described in Section 5.1.
Details on how to load and run demo models are given in Section 7.
Note that once you have installed ArtiSynth, you still have the option to later import it into an IDE such as Eclipse. For Eclipse specifically, this is done by importing it as an external project, as described in Section 13.2.
7 Loading and Running Models
7.1 Using the Models menu
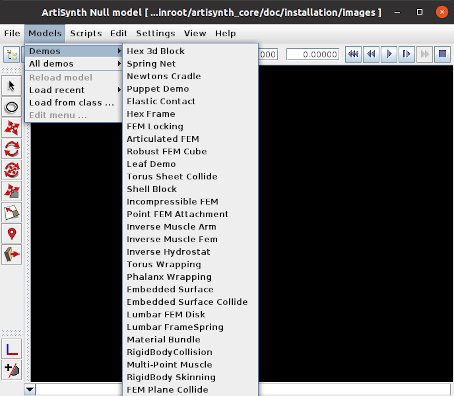
After ArtiSynth starts up, you can load and run demonstration models. Do this by selecting Models > Demos from the main menu and choosing a demo model (Figure 1).
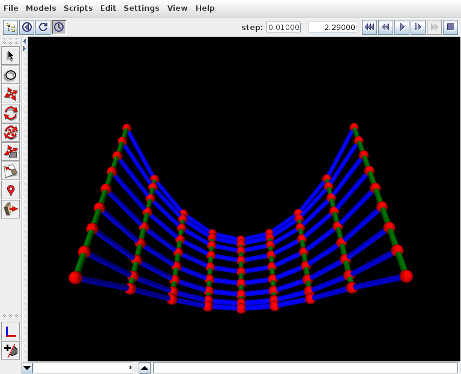
Once a model is loaded, it will appear in the viewer, and simulation can be controlled using the “play” controls located at the upper right of the application window:
From left to right, these are: step size control, which controls the simulation step size (in seconds); current simulation time (in seconds); and the reset, skip-back, play/pause, single-step, skip-forward and stop-all buttons. Starting and stopping a simulation is done by clicking play/pause, while reset resets the simulation to time 0. The single-step button advances the simulation by one time step. The stop-all button will also stop the simulation, as well as any Jython commands or scripts that are running.
Detailed information on how to use the ArtiSynth GUI for model visualization, navigation and simulation control is given in the ArtiSynth User Interface Guide.
Figure 2 shows ArtiSynth with the Spring Net demo loaded.
7.2 Other ways to load models
It is possible to load models in several ways:
-
•
Using a model menu entry, as described above;
-
•
Specifying the Java class describing the model (“Load from class ...” from the Models menu);
-
•
Specifying a .art file containing a text representation of the model (“Load model ...” from the File menu);
-
•
Reloading a recently loaded model (“Load recent” from the Models menu).
It is also possible to configure ArtiSynth to load a specific model when it starts up; see “Loading, Simulating and Saving Models” in the ArtiSynth User Interface Guide. The model menu can also be customized, as described in “Customizing the Model Menu”.
7.3 Viewing and interacting with models
The ArtiSynth user interface provides a variety of tools for exploring and interacting with models, as described in depth in the ArtiSynth User Interface Guide, including:
-
•
3D viewers with grids and clipping planes;
-
•
Component selection using either a viewer or a tree-based navigation panel;
-
•
Property inspection and editing for selected components;
-
•
3D fixtures for translating, rotating and applying forces to models and their components;
-
•
A timeline for viewing and organizing input/output data streams known as probes;
-
•
Some simple model editing, including the ability to interactively delete components and add marker points;
-
•
Making movies from simulations.
7.4 Command line arguments
If you are running ArtiSynth from a terminal window (Section 5.1) then you can supply it with command line arguments to control different aspects of its behavior. A full list of these can be seen by running artisynth with the -help option:
> artisynth -help
Descriptions of these options appear in various places within the ArtiSynth documentation. For example, one commonly used option is -model <modelClassName>, which instructs ArtiSynth to preload a model associated with a given class name:
> artisynth -model artisynth.demos.mech.SpringMeshDemo
If you are running under Eclipse, command line arguments can be set in the launch configuration, as described in Section 13.4.
8 Creating and Adding Models
Most users will want to develop their own ArtiSynth models using Java code. This is done by creating a special Java model class, which is a subclass of RootModel and which contains a build() method that assembles the model from the various Java components that ArtiSynth provides. For example, suppose your model class is called MyModel. This will be implemented inside a Java source file called MyModel.java, a skeleton implementation of which might look like this:
Full details on how to create a model in Java and the components that are available to do so are given in the ArtiSynth Modeling Guide. For this discussion, we will consider only how to add a model to ArtiSynth once it has been created. The easiest way to do this is to add its source code to the ArtiSynth source code, as described below. However, as a general practice, it is recommended that the model source code be kept separate from ArtiSynth, as described in Section 10.
8.1 Model packages
A model should be implemented inside a Java package, which will contain the model class, and perhaps other supporting classes used to implement it. The package is defined by the package statement at the beginning of each .java file. For the MyModel example above, the package is artisynth.models.mymodels.
Java enforces certain rules for how its source code is organized. In particular, all the .java files associated with a specific package must be placed in the same folder, which in turn must be located in a directory tree that reflects the package hierarchy. For example, source code for the package pack.foo.bar must be placed in a folder whose path (relative to the top of the source tree) is pack/foo/bar. For the MyModel example, MyModel.java must be placed in a folder artisynth/models/mymodels relative to the top of the source tree.
The source code tree for ArtiSynth is rooted at <ARTISYNTH_HOME>/src. It already contains a large number of model classes located in packages such as artisynth.demo.mech, whose source code is therefore located at
<ARTISYNTH_HOME>/src/artisynth/demos/mech
The easiest way to add your own model to ArtiSynth is to simply add the source code for its package to the appropriate location under <ARTISYNTH_HOME>/src. For MyModel, the source code would therefore be placed in
<ARTISYNTH_HOME>/src/artisynth/models/mymodels
Since the ArtiSynth source tree already contains the (empty) folder artisynth/models, in this case it would only be necessary to add the mymodels folder below it.
Multiple models may be placed in any given package. For example, artisynth.demos.tutorial contains a large number of models used as examples for the Modeling Guide.
8.2 Compiling models
When source code is added or modified within the ArtiSynth source tree, it needs to be compiled. How this is done depends on your development environment.
If you are using Eclipse and automatic building is enabled for a project (such as artisynth_core), compilation will occur automatically whenever that project’s .java files are modified. To see if automatic building is enabled, select the project in the Package Explorer, open the Project menu and check Build Automatically. If automatic building is not enabled, the project can be built by selecting Build Project.
If you add or edit source files from outside Eclipse, for example by using an external text editor, then you need to refresh the project in order for Eclipse to notice the changes. To refresh, select the project in the Package Explorer, and then either right-click and choose Refresh, or simply hit the F5 key.
If you are compiling from the command line , using either the make or compile commands described earlier, then running these in any given source directory will compile all the .java files contained below it. This will typically be faster than compiling the entire source tree by running make or compile from <ARTISYNTH_HOME>.
To be able to run compile from any directory, place <ARTISYNTH_HOME>/bin in your PATH environment variable (Section 14.1).
If you add a new package directory and want to run make from that directory, you will need to add a Makefile to it. The easiest way to do this is to simply copy an existing Makefile from another package and adjust the PACKAGE_NAME and ROOT_DIR entries; the number of ‘..’ entries in ROOT_DIR should equal the number of “up” steps needed to reach <ARTISYNTH_HOME>.
8.3 Finding models in the model menu
Once a model has been added to ArtiSynth, it is useful to be able to run it directly from the model menu, located under Models in the main menu bar.
By default, the model menu locates all models in the packages (and subpackages) of artisynth.demos andartisynth.model, and makes then available under the entries All demos > and All models >, respectively. Therefore, if your model is located in one of these packages, it will automatically appear in the Models menu. If your model is located in a different package, you can load it either by directly specifying its class path, or by customizing the Models menu. These options are described in the sections “Loading by class path” and “Customizing the Model Menu” of the ArtiSynth User Interface Guide,
9 Settings and the user configuration folder
When ArtiSynth is first run, it creates a configuration folder named ArtiSynthConfig beneath the user’s home folder. Various subfolders within this are used to store startup settings, model menu customizations, etc.
Startup settings that can be configured include those for the viewer, mouse bindings, model interaction and simulation, as discussed in the “Preferences” section and elsewhere in the ArtiSynth User Interface Guide.
10 Integrating external models
While it is easiest to add a model to ArtiSynth by simply placing its source code under <ARTISYNTH_HOME>/src, as described in Section 8, it is usually best practice to keep model source code separate from ArtiSynth. This is largely to avoid conflicts when ArtiSynth is updated (Section 12) or reinstalled.
When model source code is external to ArtiSynth, one must manage two things:
-
1.
Making the ArtiSynth classes visible to the Java compiler when compiling the code;
-
2.
Making the model classes visible to ArtiSynth when running the model.
This involves managing the class path used by either the Java compiler or by ArtiSynth.
For purposes of this discussion, we will assume that the model is contained under a top-level directory denoted by <MYPROJECT>, and that the root directories for the Java source code and class files are <MYPROJECT>/src and <MYPROJECT>/classes, respectively. This Java file structure is common, and is used by artisynth_core and most other projects currently associated with ArtiSynth.
10.1 Making ArtiSynth visible to the compiler
How this is done depends on your development environment.
10.1.1 Eclipse development
When using Eclipse, the project will also be associated with an Eclipse project name, which we will call myproject. In order for myproject to compile, the ArtiSynth project artisynth_core should be added to the build path of myproject, as described in Section 13.5. This will ensure that the ArtiSynth classes are added to the class path used by the Java compiler.
Some projects, such as artisynth_models, already have their build path preconfigured to contain artisynth_core, and so for them this step is unnecessary.
10.1.2 Command line development
If you are compiling from the command line , then the compile command described earlier will still work, provided that, as assumed above, <MYPROJECT> contains the source and classes directories src/ and classes/. The compile command will supply the Java compiler with a class path containing all the ArtiSynth classes, plus <MYPROJECT>/classes. If additional classes are needed (such as external JAR files or class directories from other projects), they may be added by setting them in the CLASSPATH environment variable (Section 14.2).
Use of the make command will require setting up Makefiles in the directories in which you wish to run make. It will also (usually) require setting the CLASSPATH environment variable to contain the ArtiSynth class path entries,
<ARTISYNTH_HOME>/classes;<ARTISYNTH_HOME>/lib/*
where as usual <ARTISYNTH_HOME> should be expanded to the path for the ArtiSynth installation directory. The character ‘*’ functions as a wildcard to specify all the JAR files in <ARTISYNTH_HOME>/lib.
10.2 Making external models visible to ArtiSynth
10.2.1 Running from Eclipse
When running ArtiSynth under Eclipse, you can make myproject’s models visible by adding myproject to the ArtiSynth launch configuration, as described in Section 13.6.
10.2.2 Using the external classpath
External models can be made visible to ArtiSynth by adding any needed class directories and JAR files to the external class path. The easiest way to do this is to select “Settings > External classpath ...” from the Settings menu, which will open an external classpath editor as shown in Figure 3, allowing the necessary class directories and JAR files to be added. The classpath entries are displayed in a large panel on the left (which will initially be blank after ArtiSynth is first installed).
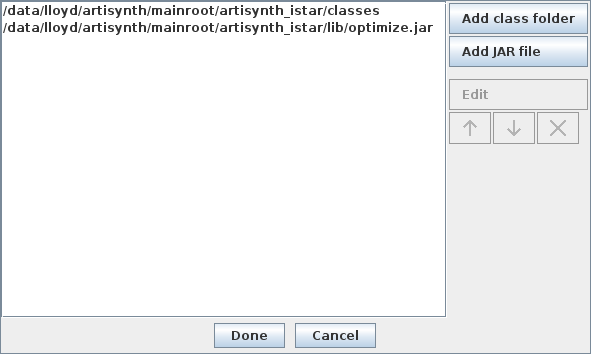
As an example, assume that the model class files are contained under <MYPROJECT>/classes, and that the JAR file <MYPROJECT>/lib/dicom.jar is also required. If <MYPROJECT> is located at /research/myproject, then the following entries should be added to the external classpath:
/research/myproject/classes
/research/myproject/lib/dicom.jar
ArtiSynth must be restarted for external classpath changes to come into effect.
More details are given in the section “Setting the external classpath” of the ArtiSynth User Interface Guide. The external classpath is stored in the file EXTCLASSPATH in the user configuration folder and can be edited directly (Section 14.4).
The external classpath can be used when running from Eclipse or any other IDE.
10.2.3 Setting the CLASSPATH environment variable
When running ArtiSynth from the command line, external models can also be made visible by adding class folders and JAR files to the CLASSPATH environment variable, as described in Section 14.2. For the example of Section 10.2.2, we could instead add the following to CLASSPATH:
/research/myproject/classes;/research/myproject/lib/dicom.jar
Note that in this situation the ArtiSynth class files do not need to be included in CLASSPATH, as they will be added automatically.
10.2.4 Using the -cp option
ArtiSynth also provides the command line option -cp which allows a class path to be specified directly:
> artisynth -cp "/research/myproject/classes:/research/myproject/lib/dicom.jar"
Class paths specified using -cp will replace any specified through the CLASSPATH variable.
11 Installing artisynth_models
artisynth_models is an open source collection of anatomical models, focused primarily on the head and neck region (see www.artisynth.org/models). It can be obtained either as a precompiled release, or from GitHub.
Once installed, the models will appear in the ArtiSynth Models menu under Models > and All models >.
11.1 Installing a precompiled release
If you are running a precompiled release of ArtiSynth, then you will need to use the corresponding precompiled release of artisynth_models, which can be obtained from
www.artisynth.org/Software/ModelsDownload
Download the distribution you want and unzip it in your desired location; the recommended spot is right next to artisynth_core.
artisynth_models comes preconfigured with Eclipse project files, and so can be immediately imported into Eclipse as an external project, as described in Section 13.2. To make the models visible to ArtiSynth when running from Eclipse, it will be necessary to add artisynth_models to the ArtiSynth launch configuration, as described in Section 13.6.
If you are running ArtiSynth from the command line , you will need to ensure that the class directory artisynth_models/classes is visible to ArtiSynth, as described in Section 10.2.
11.2 Installing from GitHub
The latest development version of artisynth_models is available from GitHub at the URL
https://github.com/artisynth/artisynth_models.git
11.2.1 Installation using Eclipse
If you are using Eclipse, you can install artisynth_models in the same way as for artisynth_core (Section 6.1):
-
1.
Select “File > Import ...”, open “Git > Projects from Git” in the Import dialog, and click Next.
-
2.
In the Select Repository Source dialog, choose Clone URI, and click Next.
-
3.
In the Source Git Repository dialog, enter
https://github.com/artisynth/artisynth_models.git
in the URI field at the top, and click Next. -
4.
In the Branch Selection dialog, uncheck svn and click Next.
-
5.
In the Local Destination dialog, adjust the install location if desired, and click Next.
-
6.
artisynth_models will now be downloaded. A “wizard” dialog will then appear. Leave the default (“Import existing Eclipse projects”) selected, and click Next.
-
7.
In the Import Projects dialog, click Finish.
artisynth_models should now compile automatically; there is no need to download external libraries. However, to make the models visible to ArtiSynth when running from Eclipse, it will be necessary to add artisynth_models to the ArtiSynth launch configuration, as described in Section 13.6.
11.2.2 Installation from the command line
If you have placed <ARTISYNTH_HOME>/bin in your PATH environment variable (Section 14.1), so that the compile command can be called from any directory, then artisynth_models can be installed from a terminal window as follows:
The last line uses the compile command instead of make because the latter will not work unless the CLASSPATH environment variable has been set to include the ArtiSynth class path entries, as described in Section 10.1.2.
If you run ArtiSynth from the command line, you will need to ensure that artisynth_models/classes is visible to ArtiSynth, as described in Section 10.2.
12 Updating ArtiSynth
One reason to install ArtiSynth from GitHub is to be able to update the codebase to incorporate new features and bug fixes. When a significant update occurs, a posting is made to the ArtiSynth update log, currently located at www.artisynth.org/doc/html/updates/updates.html. Users may also be notified via the artisynth-updates email list.
Eclipse users may update simply by selecting the artisynth_core in the Package Explorer and then right clicking and choosing Team > Pull.
Updating may also be done from a terminal window:
 > cd <ARTISYNTH_HOME>
 > git pull
If local changes have been made to artisynth_core that interfere with the changes made by the update, a Git pull operation may result in a conflict. Conflict resolution is outside the scope of this document, but documentation on this is available online. Conflicts should not occur if local changes have not been made to artisynth_core.
Other Git-based projects, such as artisynth_models, may be updated similarly.
12.1 Library updates
Occasionally, a software update will be accompanied by a change in the libraries located in <ARTISYNTH_HOME>/libs. When this happens, it will be indicated on the ArtiSynth update log and appropriate instructions will be given. In these cases, one should also update the ArtiSynth libraries.
The easiest way to do this is from within ArtiSynth, by selecting “Update Libraries” at the bottom of the File menu.
Libraries can also be updated using the command updateArtisynthLibs located in <ARTISYNTH_HOME>/bin. This can be done from a terminal window:
 > cd <ARTISYNTH_HOME>
 > bin/updateArtisynthLibs
13 The Eclipse IDE
Eclipse is an integrated development environment (IDE) commonly used for Java code development, and many ArtiSynth developers use it for both developing models in Java and for running the system. This section describes how to install Eclipse and provides some other information relevant to ArtiSynth users. A general introduction to Eclipse is beyond the scope of this document, but there are many Eclipse resources available online.
13.1 Installing Eclipse
This document describes specifically the installation of Eclipse 2020-12; other versions should be similar.
Eclipse can be downloaded from www.eclipse.org/downloads/packages. From this page, choose “Eclipse IDE for Java Developers”, Linux x86_64, which will download the file
eclipse-java-2020-12-R-linux-gtk-x86_64.tar.gz
Untar this file into any desired install location, and then run the eclipse executable in the top-level directory. A dialog will appear, asking you to select a workspace directory (Figure 4). This is where Eclipse settings and project information will be stored. Unless you have a another Eclipse already installed, the default location should be fine. (Remember also to check the “Use this as the default ...” box so that this query won’t appear every time you open Eclipse.) Next, click Launch. A welcome page will appear; close this. A “donate” panel may also appear; close this too. You should then see an empty Eclipse display, similar to Figure 5.

This is where Eclipse settings and project information will be stored. Unless you have a another Eclipse already installed, the default location should be fine. (Remember also to check the “Use this as the default ...” box so that this query won’t appear every time you open Eclipse.) Next, click Launch. A welcome page will appear; close this. A “donate” panel may also appear; close this too. You should then see an Emily Eclipse display, similar to Figure 5.
13.1.1 Setting Eclipse to use the correct Java JDK
Newer versions of Eclipse come with their own version of Java. However, if we are using our own JDK (as described in Section 4), we need to configure Eclipse to use that instead.
Eclipse can be configured to use your JDK as follows:
-
1.
From the main menu, select “Window > Preferences”.
-
2.
A Preferences dialog will open. In the left panel, select “Java > Installed JREs”, which will open an Installed JREs panel. Click the Add... button at the right.
-
3.
A JRE Type dialog will appear. Leave “Standard VM” selected in the dialog and click Next.
-
4.
A JRE Definition dialog will appear. In the “JRE home” field at the top, enter the installation directory for your JDK.
-
5.
Click Finish. Your Java JDK will now show up in the list of installed JREs. Click on the left box to select it; ignore any warnings about Java 15 compatibility.
-
6.
Finish by clicking the “Apply and Close” button at the bottom of the Preferences dialog.
13.1.2 Preventing excess resource copying
By default, ArtiSynth classes are placed in file tree located beneath <ARTISYNTH_HOME>/classes that is separate from the source tree located beneath <ARTISYNTH_HOME>/src. That means that Eclipse will try to copy all non-Java files and directories from the source tree into the build tree. For ArtiSynth, this is excessive, and results in many files being copied that don’t need to be, since ArtiSynth looks for resources in the source tree anyway.
To prevent this copying:
-
1.
Choose “Window > Preferences”.
-
2.
Select Java > Compiler > Building.
-
3.
Open Output folder, and in the box entitled Filter resources, enter the single character ‘*’.
13.2 Importing external projects
Let <PROJECT_DIR> denote the top-level directory of the project to be imported. (In the case of artisynth_core, this will also be <ARTISYNTH_HOME>.) Assuming that <PROJECT_DIR> contains an Eclipse .project file, you can import it into Eclipse as follows:
-
1.
From within Eclipse, choose “File > Import ...”.
-
2.
An Import dialog will appear. Select General > Existing Projects into Workspace and click Next.
-
3.
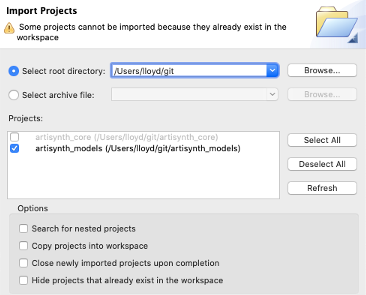
An Import Projects dialog will appear. In the field Select root directory, enter (or browse to) the parent directory of <PROJECT_DIR>. The project itself should now appear in the Projects box (Figure 6). (If other projects are contained in the parent directory, these will appear as well.) Make sure that the desired project is selected and then click Finish.
If Eclipse complains that "No projects are found to import", or does not otherwise show the project as available for import, then most likely the <PROJECT_DIR> directory does not contain a .project file.
13.3 Configuring environment variables
While it is generally not necessary to set environment variables in Eclipse, it may be useful to do this on occasion to control certain aspects of ArtiSynth’s operation. Directions on setting the environment variables are given in Section 13.3.1, and descriptions of the variables themselves may be found in Section 14.2.
If any environment variables have already been set externally in Linux (Section 14.2), such that they are visible to Eclipse at start-up, then they do not need to be set in the launch configuration.
13.3.1 Setting environment variables
To set environment variables within Eclipse:
-
1.
Open a java perspective if necessary by choosing Window > Open Perspective > Java.
-
2.
Select the ArtiSynth project in the Package Explorer form.
-
3.
Choose “Run > Run Configurations...” to open the Run Configurations window.
-
4.
In the left panel, under Java Application, select the launch configuration (the default is named ArtiSynth).
-
5.
In the right panel, select the Environment tab.
-
6.
To create a new environment variable, click the New button and enter the name and value in the dialog box.
-
7.
When finished, make sure that Append environment to native environment is selected, and click Apply.
13.4 Command line and JVM arguments
As described in Section 7.4, the artisynth command accepts command line arguments. To invoke these when running from Eclipse, it is necessary to set the desired arguments in the launch configuration, as described below.
Sometimes it may also be necessary to set JVM arguments, which control the Java virtual machine running ArtiSynth. An example of such an argument is -Xmx, which can be used to increase the maximum amount of memory available to the application. For example, -Xmx6g sets the maximum amount of memory to 6 gigabytes.
13.4.1 Setting command line and JVM arguments
To set command line arguments for your Eclipse application:
-
1.
Open a java perspective if necessary by choosing Window > Open Perspective > Java.
-
2.
Select the ArtiSynth project in the Package Explorer form.
-
3.
Choose “Run > Run Configurations...” to open the Run Configurations window.
-
4.
In the left panel, under Java Application, select the launch configuration (the default is named ArtiSynth).
-
5.
In the right panel, select the Arguments tab.
-
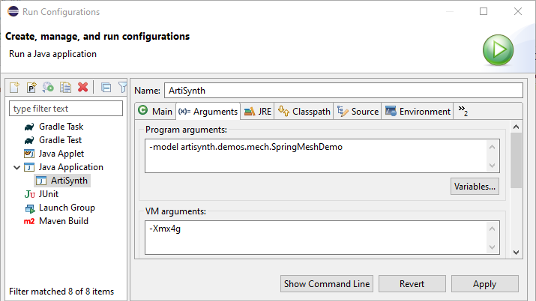
6.
Program arguments (which are passed directly to ArtiSynth) should be specified in the Program arguments box. JVM arguments should be specified in the VM arguments box. See Figure 7.
-
7.
When finished, click Close.
13.5 Adding projects to the build path
A project imported into Eclipse may depend on the packages and libraries found in other projects to compile properly. For example, ArtiSynth applications which are external to artisynth_core will nonetheless depend on artisynth_core. To ensure proper compilation, project dependencies should be added to each dependent project’s build path.
-
1.
Select the dependent project in the Package Explorer form.
-
2.
Right click and choose “Build Path > Configure Build Path...”
-
3.
In the right panel, select the Projects tab.
-
4.
Click the Add button, select the project dependencies, and click OK
-
5.
Click OK in the Java Build Path panel
13.6 Adding projects to the ArtiSynth launch configuration
The classes of external projects can be made visible to ArtiSynth by adding the projects themselves to the Classpath of the ArtiSynth launch configuration.
-
1.
From the main menu, choose “Run > Run Configurations...” to open a Run Configurations dialog.
-
2.
In the left panel, under Java Application, select your ArtiSynth launch configuration (the default one is called ArtiSynth). This may already be selected when you open the panel.
-
3.
In the right panel, select the Classpath tab.
-
4.
In the Classpath window, select User Entries, and then click the Add Projects button.
-
5.
In the Project Selection dialog, select the external projects that you wish to add. Generally, the boxes “Add exported entries ...” and “Add required projects ...” can be unchecked. Click OK.
-
6.
Close the Run Configurations dialog.
14 Additional Information
14.1 Adding Directories to the System Path
The system “Path” is a list of directories which the system searches in order to find executables. Adding a directory to the path allows executables contained in that directory to be called directly from a terminal window.
On Linux, directories can be added to the path by appending them to the PATH environment variable, which is a list of directories separated by colons ‘:’. The most direct way to do this is to redefine PATH inside one of the initialization files for whichever command line shell you are using.
Assume that your home folder is <HOMEDIR>. Then for the bash shell, one can edit <HOMEDIR>/.bashrc (or create the file if it does not already exist) and insert a line of the form
export PATH=<DIR>:$PATH
while for the csh or tcsh shells, one can edit <HOMEDIR>/.cshrc and insert a line of the form
setenv PATH <DIR>":"$PATH
Most most command windows and applications need to be restarted in order to get them to notice changes to PATH.
14.2 Environment variables
This is a glossary of all the environment variables that are associated with building or running ArtiSynth. Often, the system can detect and set appropriate values for these automatically. In other cases, as noted in the above documentation, it may be necessary or desirable for the user to set them explicitly.
- ARTISYNTH_HOME
-
The path name of the ArtiSynth installation directory.
- CLASSPATH
-
A list of directories and/or JAR files, separated by colons ‘:’, which Java uses to locate its class files.
- PATH
-
A list of directories, separated by colons ‘:’, which the operating system uses to locate executable programs and applications. Placing <ARTISYNTH_HOME>/bin in PATH (as described in Section 14.1) will allow you to run artisynth and related commands directly from a command window.
- OMP_NUM_THREADS
-
Specifies the maximum number of processor cores that are available for multicore execution. If not set, the system uses the maximum number of cores available. Users can also set this number from within ArtiSynth by setting the configuration property numSolverThreads, either for the current session by choosing “Settings > Interaction ...” from the main menu, or for all sessions by choosing “Settings > Preferences ... > Interaction”.
Note that settings for most of the above can be derived from the value of ARTISYNTH_HOME.
14.2.1 Example environment set up for bash
If you are using bash as your shell, then the environment can be configured by placing a block of commands similar to the following in one of your bash initialization files (typically ~/.bashrc), located in your home directory:
Be sure to set ARTISYNTH_HOME to the proper location of your ArtiSynth installation directory.
These environment variables will be passed on to any program which you run from the shell (such as artisynth or eclipse).
Alternatively, you can source the script setup.bash, located in the installation directory:
> source setup.bash
This will determine the system type automatically and set the environment variables accordingly, with ARTISYNTH_HOME set to the current directory from which the script is called.
14.2.2 Example environment setup for csh or tcsh
If you are using csh or tcsh as your shell, then the environment can be configured by placing a block of commands similar to the following in your .cshrc file, located in your home directory:
These environment variables will be passed on to any program which you run from the shell (such as artisynth or eclipse).
Alternatively, you can source the script setup.csh, located in the installation directory:
> source setup.csh
This will determine the system type automatically and set the environment variables accordingly, with ARTISYNTH_HOME set to the current directory from which the script is called.
14.3 ArtiSynth Libraries
ArtiSynth uses a set of libraries located under <ARTISYNTH_HOME>/lib. These include a number of JAR files, plus native libraries located in architecture-specific sub-directories (Linux64 for 64-bit Linux systems).
As described in Section 6, these libraries need to be downloaded automatically if the system is obtained from the GitHub repository. The required libraries are listed in the file <ARTISYNTH_HOME>/lib/LIBRARIES. This file is checked into the repository, so that the system can always determine what libraries are needed for a particular checkout version.
Occasionally the libraries are changed or upgraded (Section 12). If you run ArtiSynth with the -updateLibs command line option, the program will ensure that not only are all the required libraries present, but that they also match the latest versions on the ArtiSynth server.
14.4 The EXTCLASSPATH File
The EXTCLASSPATH file is stored in the user configuration folder (Section 9) and contains the entries for the external class path (Section 10.2.2). It is usually edited within ArtiSynth by selecting “External classpath ...” from the Settings menu but can also be edited directly. Each file entry describes a class directory or JAR file needed to run models external to the core ArtiSynth package. Entries are usually placed one per line, but multiple entries can be made on the same line if separated by colons ‘:’.
The syntax rules for EXTCLASSPATH are:
-
1.
Entries on the same line should be separated colons ‘:’.
-
2.
The ‘#’ character comments out all remaining characters to the end of line.
-
3.
The ‘$’ character can be used to expand environment variables.
-
4.
Any spaces present will be included in the entry name.
An example EXTCLASSPATH might look like this:
/research/artisynth_models/classes
/research/models/special.jar
$HOME/projects/crazy/classes
14.5 Quick Git Summary
Git is a distributed source control management (SCM) system that is widely used in the software industry. A full discussion of Git is beyond the scope of this document, but a large literature is available online. Generally, when you clone a Git repository, you create a local copy of that repository on your machine, along with a checked out working directory containing the most recent version of the code (which is referred to as the HEAD).
Unlike client/server SCMs, Git is distributed, with users maintaining their own private copies of a repository. This allows a great deal of flexibility in usage, but also adds an extra “layer” to the workflow: when you “checkout” from a repository or “commit” to it, you do so with respect to your own local copy of that repository, not the original (origin) repository from which you performed the original clone. The process of merging in changes from the origin to the local repository is known as “pulling”, while committing changes from the local repository back to the origin is known as “pushing”.
There is also another layer of interaction when you commit changes to the local repository: you first add them to a staging area (also known as the “index”), and then commit them using the commit command.
A very simple workflow for a typical ArtiSynth user is summarized below. The actions are described in command-line form, but the same commands can generally be issued through Eclipse or other interfaces. First, clone the most recent version of the ArtiSynth repository on GitHub:
git clone https://github.com/artisynth/artisynth_core.git [<dir>]
This will create a local copy of the GitHub repository, along with a checked out “working copy”, in the directory specified by <dir>, or in artisynth_core if <dir> is omitted. The repository itself will be located in a sub-directory called .git.
Other Git repositories can be cloned in a similar manner. If the repository has read access restrictions, then when performing a checkout it may also be necessary to specify a user name for which the repository has granted read access. This is typically done by embedding the user name in the URL, as in (for example):
https://user@host.xz/path/to/repo.git
Later, to fetch the latest updates from the GitHub repository and merge them into your working copy, from within the working copy directory you can do
git pull
If you make changes to some files in your working copy and wish to commit these to your local repository, you first add (or remove them) from the staging area using commands such as:
  git add <fileName>    # add a new (or modified) file
  git add *             # add all files
  git rm <fileName>     # remove a file
and then commit them to your local repository using
git commit -m "commit message"
Note that you can also add modified files and commit them using the single command
git commit -m -a "commit message"
To see the current status of the files in your working copy and the staging area, use the command
git status
and to see the commit history for particular files or directories, use
git log [ <filename> ... ]
Finally, to push your changes back to the GitHub repository (assuming you have permission do so), you would do so using the command
git push origin master
Note that the above commands all have various options not mentioned. There are also numerous topics that haven’t been discussed, including the creation and merging of branches, but there are many useful online resources that describe these in detail. Some current references include
   https://git-scm.com/docs
   http://rogerdudler.github.io/git-guide
![[LOGO]](data:image/png;base64,iVBORw0KGgoAAAANSUhEUgAAAAsAAAAOCAYAAAD5YeaVAAAAAXNSR0IArs4c6QAAAAZiS0dEAP8A/wD/oL2nkwAAAAlwSFlzAAALEwAACxMBAJqcGAAAAAd0SU1FB9wKExQZLWTEaOUAAAAddEVYdENvbW1lbnQAQ3JlYXRlZCB3aXRoIFRoZSBHSU1Q72QlbgAAAdpJREFUKM9tkL+L2nAARz9fPZNCKFapUn8kyI0e4iRHSR1Kb8ng0lJw6FYHFwv2LwhOpcWxTjeUunYqOmqd6hEoRDhtDWdA8ApRYsSUCDHNt5ul13vz4w0vWCgUnnEc975arX6ORqN3VqtVZbfbTQC4uEHANM3jSqXymFI6yWazP2KxWAXAL9zCUa1Wy2tXVxheKA9YNoR8Pt+aTqe4FVVVvz05O6MBhqUIBGk8Hn8HAOVy+T+XLJfLS4ZhTiRJgqIoVBRFIoric47jPnmeB1mW/9rr9ZpSSn3Lsmir1fJZlqWlUonKsvwWwD8ymc/nXwVBeLjf7xEKhdBut9Hr9WgmkyGEkJwsy5eHG5vN5g0AKIoCAEgkEkin0wQAfN9/cXPdheu6P33fBwB4ngcAcByHJpPJl+fn54mD3Gg0NrquXxeLRQAAwzAYj8cwTZPwPH9/sVg8PXweDAauqqr2cDjEer1GJBLBZDJBs9mE4zjwfZ85lAGg2+06hmGgXq+j3+/DsixYlgVN03a9Xu8jgCNCyIegIAgx13Vfd7vdu+FweG8YRkjXdWy329+dTgeSJD3ieZ7RNO0VAXAPwDEAO5VKndi2fWrb9jWl9Esul6PZbDY9Go1OZ7PZ9z/lyuD3OozU2wAAAABJRU5ErkJggg==)