6.8 Varying and augmenting material behaviors
The default material used by all elements of an FEM model is supplied by the model’s material property. However, it is often the case that one wishes to specify different material behaviors for different sets of elements within an FEM model. This may be particularly true when combining volumetric and shell elements.
There are several ways to vary material behavior within a model. These include:
-
•
Setting an explicit material for specific elements, using their material property. An element’s material is null by default, but if set to a material, it will override the default material supplied by the FEM model. While this method is quite straightforward, it does have one disadvantage: because material settings are copied by each element, subsequent interactive or online changes to the material require resetting the material in all the affected elements.
-
•
Binding one or more material parameters to a field. Sometimes certain material parameters, such as stiffness quantities or direction information, may need to vary across the FEM domain. While sometimes this can be handled by setting material properties for specific elements, it may be more convenient to bind the varying properties to a field, which can specify varying values over a domain composed of either a regular grid or an FEM mesh. Only one material needs to be used, and any properties which are not bound can be adjusted interactively or online. Fields and their bindings are described in detail in Chapter 7.
-
•
Adding augmenting material behaviors using MaterialBundles. A material bundle may be specified either for all elements, or for a subset of them, and each provides one material (via its own material property) whose behavior is added to that of the indicated elements. This also provides an easy way to combine the behaviors of two of more materials in the same element. One also has the option of setting the material property of the certain elements to NullMaterial, so that only the augmenting material(s) are applied.
-
•
Adding muscle behaviors using MuscleBundles. This is analogous to using MaterialBundles, except that MuscleBundles are restricted to using an instance of a MuscleMaterial, and include support for handling the excitation value, as well as the activation directions (which usually vary across the FEM domain). MuscleBundles are only present in the FemMuscleModels subclass of FemModel3d, and are described in detail in Section 6.9.
The remainder of this section will discuss MaterialBundles.
Adding a MaterialBundle to an FEM model is illustrated by the following code fragment:
Once added, the stress computed by the bundle’s material will be added to the stress computed by any other materials which are active for the bundle’s elements.
When deciding what elements to add to a bundle, one is free to choose any means necessary. The example above inspects all the volumetric elements in the FEM. To instead inspect all the shell elements, or all volumetric and shell elements, one could use the code fragments such as the following:
Of course, if the elements are known through other means, then they can be added directly.
The element composition of a bundle can be controlled by the methods
It is also possible to create a MaterialBundle whose material is added to all the FEM elements. This can done either by using one of the following constructors
with useAllElements set to true, or by calling the method
When a bundle is set to use all the FEM elements, it clears its own element list, and one is not permitted to add elements using addElement(elem).
After a bundle has been created, it is possible to get or set its material property using the methods
Again, because materials are copied internally, any modification to a material after it has been used as an input to setMaterial() will not be noticed by the bundle. Instead, one should modify the material before calling setMaterial(), or modify the copied material which can be obtained by calling getMaterial() or by storing the value returned by setMaterial().
Finally, a MaterialBundle is a renderable component. Setting its elementWidgetSize property to a value greater than zero will cause the rendering of all its elements, using a solid widget representation of each at a scale controlled by elementWidgetSize: 0.5 for half size, 1.0 for full size, etc. The color of the widgets is controlled by the faceColor property of the bundle’s renderProps. Being able to render the elements makes it easy to select the bundle and visualize which elements it contains.
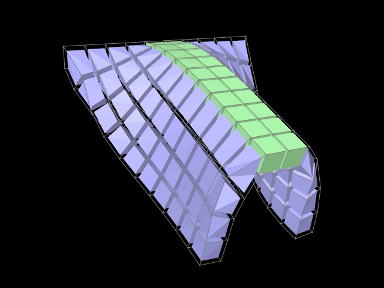
6.8.1 Example: FEM sheet with a stiff spine
A simple model demonstrating the use of material bundles is defined in
artisynth.demos.tutorial.MaterialBundleDemo
It consists of a simple thin hexahedral sheet in which a material bundle is used to stiffen elements close to the x-axis, creating a stiff “spine”. While the same effect could be achieved by simply setting a different material property for the “spine” elements, it does provide a good example of material bundle usage. The model’s build method is given below:
Lines 6-9 create a thin FEM hex sheet, centered on the origin, with
size ![]() and
and ![]() elements
along each axis. Its material is set to a linear material with a
Young’s modulus of
elements
along each axis. Its material is set to a linear material with a
Young’s modulus of ![]() . The leftmost nodes are then fixed (lines
11-16).
. The leftmost nodes are then fixed (lines
11-16).
Next, a MaterialBundle is added and used to apply an additional
material to the elements near the x axis (lines 19-29). It is given a
neo-hookean material with a much higher stiffness, and the “spine”
elements for it are selected by finding those whose centroids
have a ![]() value within 0.1 of the x axis.
value within 0.1 of the x axis.
After the bundle is added, a control panel is created allowing interactive control of the materials for both the FEM model and the bundle, along with their elementWidgetSize properties.
Finally, some render properties are set (lines 41-44). The idea is to render the elements of both the FEM model and the bundle using element widgets (both of which will be visible since there is no surface rendering and the element widget sizes for both are greater than 0). The widget size for the bundle is made larger than that of the FEM model to ensure its widgets will cover those of the latter. Widget colors are controlled by the FEM and bundle face colors, set in lines 41-42.
The example can be run in ArtiSynth by selecting All demos > tutorial > MaterialBundleDemo from the Models menu. When it is run, the sheet will fall under gravity but be much stiffer along the spine (Figure 6.15). The control panel can be used to interactively adjust the material parameters for both the FEM and the bundle. This is one advantage of using bundles: the same material can be used to control multiple elements. The panel also allows interactive adjustment of the widget sizes, to illustrate what they look like and how they are rendered.
![[LOGO]](data:image/png;base64,iVBORw0KGgoAAAANSUhEUgAAAAsAAAAOCAYAAAD5YeaVAAAAAXNSR0IArs4c6QAAAAZiS0dEAP8A/wD/oL2nkwAAAAlwSFlzAAALEwAACxMBAJqcGAAAAAd0SU1FB9wKExQZLWTEaOUAAAAddEVYdENvbW1lbnQAQ3JlYXRlZCB3aXRoIFRoZSBHSU1Q72QlbgAAAdpJREFUKM9tkL+L2nAARz9fPZNCKFapUn8kyI0e4iRHSR1Kb8ng0lJw6FYHFwv2LwhOpcWxTjeUunYqOmqd6hEoRDhtDWdA8ApRYsSUCDHNt5ul13vz4w0vWCgUnnEc975arX6ORqN3VqtVZbfbTQC4uEHANM3jSqXymFI6yWazP2KxWAXAL9zCUa1Wy2tXVxheKA9YNoR8Pt+aTqe4FVVVvz05O6MBhqUIBGk8Hn8HAOVy+T+XLJfLS4ZhTiRJgqIoVBRFIoric47jPnmeB1mW/9rr9ZpSSn3Lsmir1fJZlqWlUonKsvwWwD8ymc/nXwVBeLjf7xEKhdBut9Hr9WgmkyGEkJwsy5eHG5vN5g0AKIoCAEgkEkin0wQAfN9/cXPdheu6P33fBwB4ngcAcByHJpPJl+fn54mD3Gg0NrquXxeLRQAAwzAYj8cwTZPwPH9/sVg8PXweDAauqqr2cDjEer1GJBLBZDJBs9mE4zjwfZ85lAGg2+06hmGgXq+j3+/DsixYlgVN03a9Xu8jgCNCyIegIAgx13Vfd7vdu+FweG8YRkjXdWy329+dTgeSJD3ieZ7RNO0VAXAPwDEAO5VKndi2fWrb9jWl9Esul6PZbDY9Go1OZ7PZ9z/lyuD3OozU2wAAAABJRU5ErkJggg==)