9.1 Via Points
Multipoint springs and muscles are implemented by the classes MultiPointSpring and MultiPointMuscle, respectively. The relationship between MultiPointSpring and MultiPointMuscle is the same as that between AxialSpring and Muscle: The latter is a subclass of the former, and allows the creation of active tension forces in response to its excitation property.
An application allocates one of these components, sets the appropriate material properties for the tension forces, and then adds points and wrappable objects as desired.
Points can be added, queried, and removed using the methods
| void addPoint (Point pnt) |
Add a point. |
| void addPoint (int idx, Point pnt) |
Add (insert) a point at index idx. |
| Point getPoint (int idx) |
Get the idx-th point. |
| int indexOfPoint (Point pnt) |
Returns the index of a point. |
| int numPoints() |
Return the number of points. |
| void setPoint (int idx, Point pnt) |
Replaces a point at index idx. |
| boolean removePoint (Point pnt) |
Remove a point. |
| void clearPoints () |
Removes all points. |
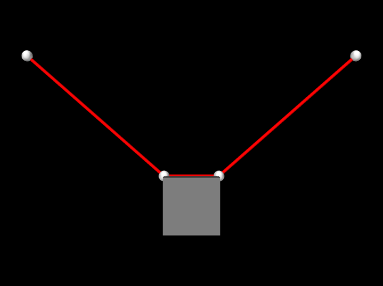
As with AxialSpring, there must be at least two points anchoring the beginning and end of the spring. Any additional points will be via points.
 |
 |
The section of a multipoint spring between any two adjacent points is known as a segment. By default, each segment forms a straight line between the two points and does not interact with any wrappable obstacles. To interact with wrappables, a segment needs to be declared wrappable, as described in Section 9.2.
Spring construction is illustrated by the following code fragment:
This creates a new MultiPointSpring and sets its material to a simple linear material with a specified stiffness and damping. Four points p0, p1, p2, p3 are then added, forming a start point, two via points, and a stop point.
9.1.1 Example: a muscle with via points
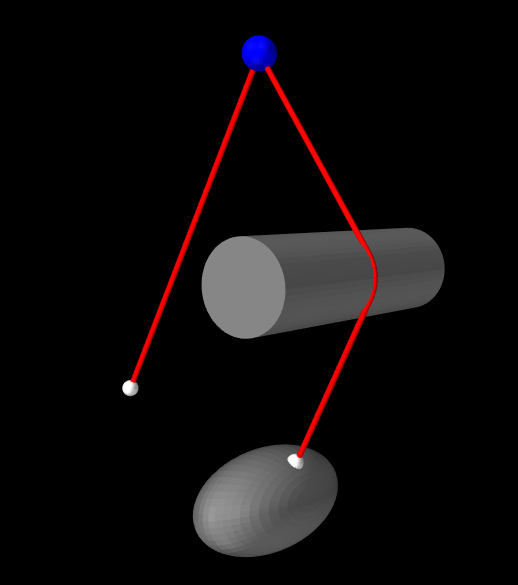
A simple example of a muscle containing via points is given by artisynth.demos.tutorial.ViaPointMuscle. It consists of a MultiPointMuscle passing through two via points attached to a block. The code is given below:
Lines 21-30 of the build() method create a MechModel and add a simple rigid body block to it. Two non-dynamic points (p0 and p1) are then created to act as muscle end points (lines 33-38), along with two markers (via0 and via1) which are attached to the block to act as via points (lines 41-44). The muscle itself is created by lines 42-53, with the end points and via points being added in order from start to end. The muscle material is a SimpleAxialMuscle, which computes tension according to the simple linear formula (4.1) described in Section 4.5.1. Lines 56-57 set render properties for the model, and line 59 creates a control panel (Section 5.1) that allows the muscle excitation property to be interactively controlled.
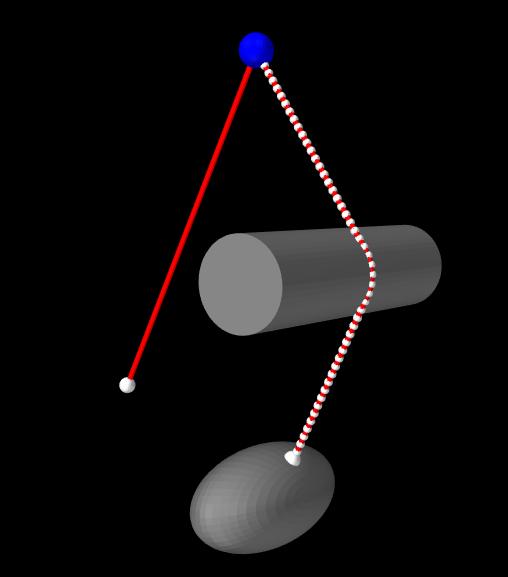
To run this example in ArtiSynth, select All demos > tutorial > ViaPointMuscle from the Models menu. The model should load and initially appear as in Figure 9.6. Running the model will cause the block to fall and swing about under gravity, while changing the muscle’s excitation in the control panel will vary its tension.
![[LOGO]](data:image/png;base64,iVBORw0KGgoAAAANSUhEUgAAAAsAAAAOCAYAAAD5YeaVAAAAAXNSR0IArs4c6QAAAAZiS0dEAP8A/wD/oL2nkwAAAAlwSFlzAAALEwAACxMBAJqcGAAAAAd0SU1FB9wKExQZLWTEaOUAAAAddEVYdENvbW1lbnQAQ3JlYXRlZCB3aXRoIFRoZSBHSU1Q72QlbgAAAdpJREFUKM9tkL+L2nAARz9fPZNCKFapUn8kyI0e4iRHSR1Kb8ng0lJw6FYHFwv2LwhOpcWxTjeUunYqOmqd6hEoRDhtDWdA8ApRYsSUCDHNt5ul13vz4w0vWCgUnnEc975arX6ORqN3VqtVZbfbTQC4uEHANM3jSqXymFI6yWazP2KxWAXAL9zCUa1Wy2tXVxheKA9YNoR8Pt+aTqe4FVVVvz05O6MBhqUIBGk8Hn8HAOVy+T+XLJfLS4ZhTiRJgqIoVBRFIoric47jPnmeB1mW/9rr9ZpSSn3Lsmir1fJZlqWlUonKsvwWwD8ymc/nXwVBeLjf7xEKhdBut9Hr9WgmkyGEkJwsy5eHG5vN5g0AKIoCAEgkEkin0wQAfN9/cXPdheu6P33fBwB4ngcAcByHJpPJl+fn54mD3Gg0NrquXxeLRQAAwzAYj8cwTZPwPH9/sVg8PXweDAauqqr2cDjEer1GJBLBZDJBs9mE4zjwfZ85lAGg2+06hmGgXq+j3+/DsixYlgVN03a9Xu8jgCNCyIegIAgx13Vfd7vdu+FweG8YRkjXdWy329+dTgeSJD3ieZ7RNO0VAXAPwDEAO5VKndi2fWrb9jWl9Esul6PZbDY9Go1OZ7PZ9z/lyuD3OozU2wAAAABJRU5ErkJggg==)