9.4 Initializing the Wrap Path
By default, when a multipoint spring or muscle is initialized (either at the start of the simulation or as a result of calling updateWrapSegments()), each wrappable segment is initialized to a straight line between its via points. This path is then adjusted to avoid and wrap around obstacles, using artificial linear forces as described in Section 9.6. The result is a local shortest path that wraps around obstacles instead of penetrating them. However, in some cases, the initial path may not be the one desired; instead, one may want it to wrap around obstacles some other way. This can be achieved by specifying additional intermediate points to initialize the segment as a piecewise linear path which threads its way around obstacles in the desired manner (Figure 9.10). These are specified using the optional initialPnts argument to the setSegmentWrappable() methods.

When initial points are specified, it is recommended to finish construction of the spring or muscle with a call to updateWrapSegments(). This fits the wrappable segments to their correct path around the obstacles, which can then be seen immediately when the model is first loaded. On the other hand, by omitting an initial call to updateWrapSegments(), it is possible to see the initial path as specified by the initial points. This may be useful to verify that they are in the correct locations.
MechModel also supplies a convenience method, updateWrapSegments()), which calls updateWrapSegments() for every multipoint spring contained within it.
In some cases, initial points may also be necessary to help ensure that the initial path does not penetrate obstacles. While obstacle penetration will normally be resolved by the artificial forces described in Section 9.6, this may not always work correctly if the starting path penetrates an obstacle too deeply.
9.4.1 Example: wrapping around a torus
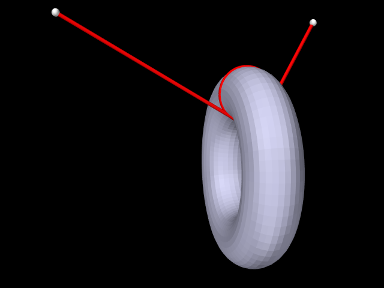
An example of using initial points is given by artisynth.demos.tutorial.TorusWrapping, in which a spring is wrapped completely around the inner section of a torus. The primary code for the build method is given below:
The mech model is created in the usual way with frame and rotary damping set to 1 and 10 (lines 4-5). The torus is created using the analytic wrappable RigidTorus (lines 8-14). The spring start and end points p0 and p1 are created at lines (17-22), and the spring itself is created at lines (26-41), with six initial points being specified to setSegmentWrappable() to wrap the spring completely around the torus inner section.
To run this example in ArtiSynth, select All demos > tutorial > TorusWrapping from the Models menu. The torus will slide along the wrapped spring until it reaches equilibrium.
![[LOGO]](data:image/png;base64,iVBORw0KGgoAAAANSUhEUgAAAAsAAAAOCAYAAAD5YeaVAAAAAXNSR0IArs4c6QAAAAZiS0dEAP8A/wD/oL2nkwAAAAlwSFlzAAALEwAACxMBAJqcGAAAAAd0SU1FB9wKExQZLWTEaOUAAAAddEVYdENvbW1lbnQAQ3JlYXRlZCB3aXRoIFRoZSBHSU1Q72QlbgAAAdpJREFUKM9tkL+L2nAARz9fPZNCKFapUn8kyI0e4iRHSR1Kb8ng0lJw6FYHFwv2LwhOpcWxTjeUunYqOmqd6hEoRDhtDWdA8ApRYsSUCDHNt5ul13vz4w0vWCgUnnEc975arX6ORqN3VqtVZbfbTQC4uEHANM3jSqXymFI6yWazP2KxWAXAL9zCUa1Wy2tXVxheKA9YNoR8Pt+aTqe4FVVVvz05O6MBhqUIBGk8Hn8HAOVy+T+XLJfLS4ZhTiRJgqIoVBRFIoric47jPnmeB1mW/9rr9ZpSSn3Lsmir1fJZlqWlUonKsvwWwD8ymc/nXwVBeLjf7xEKhdBut9Hr9WgmkyGEkJwsy5eHG5vN5g0AKIoCAEgkEkin0wQAfN9/cXPdheu6P33fBwB4ngcAcByHJpPJl+fn54mD3Gg0NrquXxeLRQAAwzAYj8cwTZPwPH9/sVg8PXweDAauqqr2cDjEer1GJBLBZDJBs9mE4zjwfZ85lAGg2+06hmGgXq+j3+/DsixYlgVN03a9Xu8jgCNCyIegIAgx13Vfd7vdu+FweG8YRkjXdWy329+dTgeSJD3ieZ7RNO0VAXAPwDEAO5VKndi2fWrb9jWl9Esul6PZbDY9Go1OZ7PZ9z/lyuD3OozU2wAAAABJRU5ErkJggg==)