14 Making Movies
ArtiSynth includes the ability to make movies from simulations. This process is controlled through a movie panel (Figure 62) that can be opened from the main application menu by navigating through View > Show movie panel.

A simple movie creation workflow, using the default settings, is the following:
-
1.
Open the movie panel.
-
2.
Start the movie capture by clicking the Start button at the bottom of the movie panel. By default, this will also start the simulation, whose progress can be examined in the main ArtiSynth viewer. Because of the movie capture overhead, the simulation will usually run more slowly than usual.
-
3.
When the desired simulation time is reached, stop the movie capture and create the movie by clicking the the Stop button.
By default, this will create a JPEG movie with a frame rate of 50 Hz, packaged in a QuickTime .mov file with a title derived from the model name, and place it in the movie folder, the default location for which is the movies subfolder of the configuration folder (Section 1.1).
More detailed control of the movie making process, including the frame rate and method used to create the movie, can be obtained by setting options in the movie panel’s Recorder, Encoder, and Advanced tabs, as described below.
Movies produced by the default method, which creates JPEG-based movie files, tend to be rather large. If you are making movies regularly, you should consider installing an external movie making application, such as FFmpeg, and then setting the movie maker to use this via the Method field on the Encoder tab (Section 14.2). This will significantly reduce the size of the movie file and likely improve movie quality. Installing FFMEG is discussed in Section 14.6.
When capturing a movie, individual images for each frame are first saved in the movie folder and then used to create the movie itself. Each image file is named frameXXXXX.zzz, where XXXXX is the sequential frame number, each X is a digit, and .zzz is the image format extension (usually .png or .jpg). If “Remove temporary files” is selected in the Recorder tab of the movie panel, the image files will be removed once the movie is made. If the files are not removed, they will be overwritten by any subsequent movie creation.
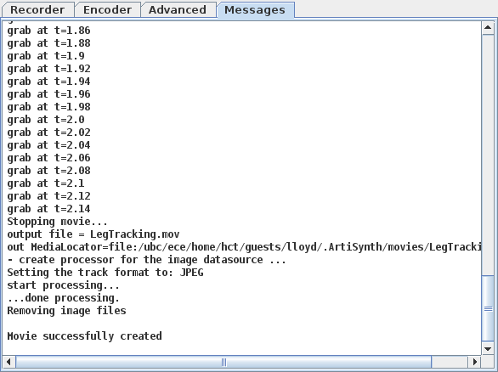
Text messages describing the movie making process will be displayed in the Messages tab (Figure 63), and a popup message will indicate its completion. If an error occurs (which may happen if a non-default movie making method is selected that is not supported on the ArtiSynth host computer), information about it will be displayed in the Messages tab.
14.1 Recorder tab
The Recorder tab (Figure 62) controls which image region to capture along with various recording and other options. Options within the tab are organized into three groups:
14.1.1 Region to capture
These options define the movie capture region, as specified by three buttons: Viewer, Window, and Custom. Viewer, which is the default, sets the capture area to be the main ArtiSynth viewer window, excluding the surrounding menus and toolbars. This is useful for recording model demonstrations. The Window option set the capture area to be the main application window, including the main viewer and the menus and toolbars surrounding it. The Custom option allows the user to manually set the capture area to be any region on the desktop, and is useful for making movies that include the timeline, control panels, or other windows that are separate from the main application window.
When Viewer mode is selected, additional options become enabled in the Output Size section of the Encoder tabs (Section 14.2) that allow you to specify an image resolution independent of the viewer’s size. The # samples specifies the size of the multi-sample buffer, which is used for anti-aliasing. This is the only mode that continues to work correctly when a screen-saver is activated.
When Custom mode is selected, a separate capture window appears that can be sized and located anywhere on the desktop, with the a red outline indicating the region that will appear in the movie. The visibility of this window can be controlled by the “Show capture frame” toggle button. The capture window emulates transparency by displaying an image of the desktop beneath it; however, this image is fixed and is only refreshed when the capture window is made visible, or when one executes a double click with the left mouse button inside it.
Four fields, labeled Width, Height, and Left and Top, display the current dimensions and location of the capture region. For Viewer and Window modes, the Width and Height fields are editable and can be used to explicitly set the dimension of the viewer or main application window. For Custom mode, all four fields are editable and can be used to explicitly set the dimension and location of the capture region.
14.1.2 Record options
These determine how the movie recorder works with ArtiSynth, and how it deals with the frame files.
- Begin playing on start
-
When the start button is clicked, the simulation will begin to run.
- End playing on stop
-
When the stop button is clicked, the simulation stops running.
- Automatic frame capture
-
Frames are automatically captured according to the movie’s frame-rate while the model is run. If this is disabled, it is up to the user to click on the Frame button to capture the next frame.
- Remove temporary files
-
When selected, the temporary frame images are deleted after the movie is made.
- Save first image
-
This saves the first frame taken, which can be useful for representing the movie in websites.
14.1.3 Other options
Two other options fields are provided near the bottom of the Recorder tab:
- Movie name
-
Specifies the base name of the movie output file; is set to the model name by default.
- Stop time
-
When set to a positive value, indicates an explicit simulation time at which the movie should be stopped. The default value of this field is blank, indicating no specified stop time.
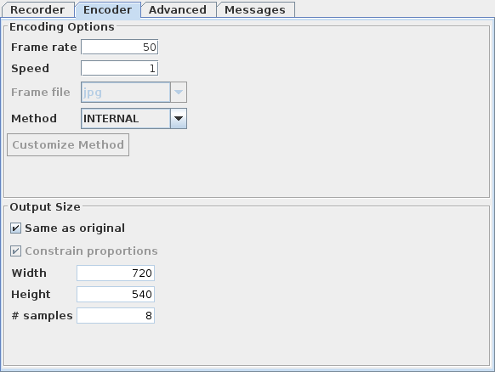
14.2 Encoder tab
The Encoder tab (Figure 64) controls encoder options and the output size.
14.2.1 Encoder options
These describe the frame rate, relative speed, and the encoding method used to make the movie.
- Frame rate
-
This is the number of frames recorded per second of movie. It is recommended to set this to be compatible with the ArtiSynth simulation step size, such that if
 is the frame rate and
  is the step
size,
is the step
size,  where
where  is a positive integer. The default
value of 50 is compatible with typical step sizes such as
is a positive integer. The default
value of 50 is compatible with typical step sizes such as  and
and  .
. - Speed
-
This is the ratio of the movie’s speed to reality’s speed. While the movie is recording, the calculations may slow down the simulation, but the movie will not be affected.
- Frame file
-
This is the format the frame images will be stored in. If the internal method (see below) is used, then the frames must be stored as JPEG files.
- Method
-
This describes the software used to create the movie from the captured frame images. Many of these methods require supporting software to be installed on the ArtiSynth host computer and runnable from a command line context.
- INTERNAL
-
Use Java’s built in support to compress the pictures into an animated JPEG.
- FFMPEG
-
Use the FFmpeg command-line utility to generate the movie. Requires FFmpeg to be installed and runnable from the command line (see Section 14.6).
- MENCODER
-
Use the mencoder command-line utility to generate the movie. Requires mencoder to be installed and runnable from the command line.
- ANIMATED_GIF
-
Uses an algorithm built into ArtiSynth to generate an animated gif. By hitting the Customize Method button, you can set the number of times to loop (-1 for infinity) and the frame rate (defaults to capture frame rate).
- AVCONV
-
Uses the avconv utility, that is sometimes available on linux systems, to generate the movie. Requires avconv to be installed and runnable from the command line.
- CUSTOM
-
Uses a custom command line utility to generate the movie. Note: the default command line specification for this option is blank, and so before using it, it must be initialized using the Customize Method button as described below.
14.2.2 Customizing the encoder command
The FFMPEG, MENCODER, AVCONV and CUSTOM methods described above all work by calling their respective encoders as a separate process, described using a command line specification, with the process’s working directory set to the movie folder. Default command line specifications are supplied for FFMPEG, MENCODER, AVCONV, while the one for CUSTOM is blank and must be supplied by the user.
Clicking the “Customize Method” button immediately below the Method field opens a text dialog that allows the command line specification to be edited. Users may alter the command in any way desired, including modifying options or changing the name of the command itself. Several special variables beginning with $ are used to supply information from the movie panel; before the command is executed, these are expanded to their current values:
- $FMT
-
Format of the frame image files. Expands to the value in the Frame file field of the Encoder tab.
- $OUT
-
Name of the output file. Expands to the value of the Movie name field in the Recorder tab.
- $FPS
-
Frame rate. Expands to the value in the Frame rate field of the Encoder tab.
The default movie making method, along with any method customizations, can be saved permanently in the user’s preferences. See Section 14.5 for details.
14.3 Output size options
These options are only used when the capture area is set to Viewer and control the size of the output video, allowing the contents of the viewer to be magnified.
- Same as original
-
The output video is created at the original size.
- Constrain proportions
-
The output video is created with constrained proportions, such that the ratio between height and width are maintained.
- Width
-
Defines the width of the output video.
- Height
-
Defines the height of the output video.
- # samples
-
Sets the number of samples to use for the multi-sample buffer. This only applies in Viewer mode, and is used to perform anti-aliasing.
Note: If your movie comes out black or only shows a section of the viewer correctly in Viewer mode, then it is likely your graphics card does not support multi-sample buffers. On machines with multiple graphics cards (e.g. laptops with both discrete and integrated graphics), make sure the Java process is set to use the discrete card. Otherwise, set # samples = 1 to disable the multi-sample buffer.
14.4 Advanced tab
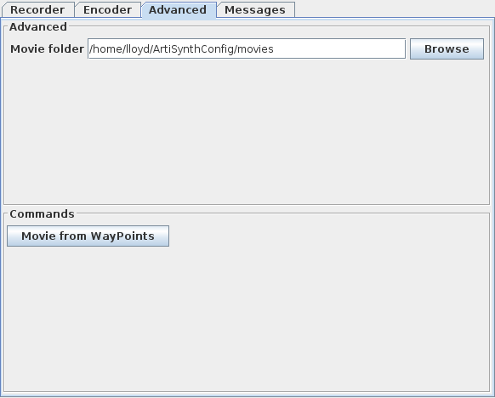
The Advanced tab (Figure 65) presently provides two options:
-
1.
A “Movie folder” field which allows the movie folder to be customized. This folder can also be saved permanently in the user’s preferences, as described in Section 14.5.
-
2.
A “Movie from waypoints” button which creates a movie from the model’s waypoint data. To work correctly, the model must have valid waypoints defined at regular intervals corresponding to the frame rate specified in the Encoder tab. The viewer image of the model at each of these waypoints is used to generate the frame image files from which the movie is then created. This enables a movie to be created from waypoint data without having to run a simulation.
14.5 Saving movie preferences
Some of the movie settings described above can be saved permanently in the user’s preferences (Section 11.2). To do this, choose Preferences from the application Settings menu and open the Movies panel.
Preferences that can be currently saved include:
-
•
Frame rate
-
•
Movie method
-
•
Movie method customization
-
•
Movie folder
To specify a method customization, select the desired method and then click the “Customize Method” button.
14.6 Installing FFmpeg
As described above, movies produced by the default method, which creates JPEG-based movie files, tend to be rather large. If you are making movies regularly, you should consider installing an external movie making application such as FFmpeg, and then setting the movie maker to use this via the Method field on the Encoder tab (Section 14.2). This will significantly reduce the size of the movie file and likely improve movie quality.
At the time of this writing, FFmpeg is available for Windows, Mac and Linux through
The easiest option is to download a precompiled release. The FFmpeg download site does not provide these itself, but refers to other sites that do. For example, the Windows download page currently contains a link to
which under git master builds contains a download link for ffmpeg-git-full.7z. This can be extracted into a location such as C:\ffmpeg, after which the installation’s bin folder (e.g., C:\ffmpeg\bin) should be added to your Windows Path environment variable. How to do this is described in the section “Adding Directories to the System Path” in the Windows version of the ArtiSynth Installation Guide.
Detailed instructions for installing FFmpeg on Windows can also be found at sites such as
![[LOGO]](data:image/png;base64,iVBORw0KGgoAAAANSUhEUgAAAAsAAAAOCAYAAAD5YeaVAAAAAXNSR0IArs4c6QAAAAZiS0dEAP8A/wD/oL2nkwAAAAlwSFlzAAALEwAACxMBAJqcGAAAAAd0SU1FB9wKExQZLWTEaOUAAAAddEVYdENvbW1lbnQAQ3JlYXRlZCB3aXRoIFRoZSBHSU1Q72QlbgAAAdpJREFUKM9tkL+L2nAARz9fPZNCKFapUn8kyI0e4iRHSR1Kb8ng0lJw6FYHFwv2LwhOpcWxTjeUunYqOmqd6hEoRDhtDWdA8ApRYsSUCDHNt5ul13vz4w0vWCgUnnEc975arX6ORqN3VqtVZbfbTQC4uEHANM3jSqXymFI6yWazP2KxWAXAL9zCUa1Wy2tXVxheKA9YNoR8Pt+aTqe4FVVVvz05O6MBhqUIBGk8Hn8HAOVy+T+XLJfLS4ZhTiRJgqIoVBRFIoric47jPnmeB1mW/9rr9ZpSSn3Lsmir1fJZlqWlUonKsvwWwD8ymc/nXwVBeLjf7xEKhdBut9Hr9WgmkyGEkJwsy5eHG5vN5g0AKIoCAEgkEkin0wQAfN9/cXPdheu6P33fBwB4ngcAcByHJpPJl+fn54mD3Gg0NrquXxeLRQAAwzAYj8cwTZPwPH9/sVg8PXweDAauqqr2cDjEer1GJBLBZDJBs9mE4zjwfZ85lAGg2+06hmGgXq+j3+/DsixYlgVN03a9Xu8jgCNCyIegIAgx13Vfd7vdu+FweG8YRkjXdWy329+dTgeSJD3ieZ7RNO0VAXAPwDEAO5VKndi2fWrb9jWl9Esul6PZbDY9Go1OZ7PZ9z/lyuD3OozU2wAAAABJRU5ErkJggg==)